
领先一步
VMware 提供培训和认证,助您快速发展。
了解更多本文是系列博客的第 3 部分,介绍了用于 Spring Cloud Stream 应用程序的 Java 函数。
本系列的其他部分。
在本系列的最后两篇博客中,我们提供了对将所有现有 Spring Cloud Stream App Starters 迁移到函数的新举措的一般介绍,以及组合它们的各种方式。在本博客中,我们将继续本系列,展示如何开发、测试这些函数以及如何使用它们生成 Spring Cloud Stream 应用程序。特别地,本文重点介绍如何编写 supplier 函数(实现 java.util.function.Supplier),然后生成 Spring Cloud Stream 的相应 source 应用程序。
为了深入理解这个概念,我们将采用一个用例并实现一个解决方案来满足它。
我们需要一个函数,当使用正确的配置调用时,它会以 atom、rss 等格式提供博客订阅源的内容。我们需要支持两种 supplier 调用模型 - 一种是我们在 FaaS 环境中通过编程方式调用函数(例如,一个 REST 端点),另一种是 streaming supplier,一旦订阅源可用,我们就能获得持续的数据流。我们希望基于 ROME 库构建这些 suppliers,ROME 库是一个流行的订阅源聚合库。我们将从非 Spring 开发者和 Spring 开发者两种视角来看待这个问题。
假设你不是 Spring 开发者,并且不熟悉已经为 ROME 提供抽象的 Spring Integration。在这种情况下,我们当然可以直接使用 ROME 来生成订阅源记录。例如,这是一个适用于此场景的有效 Supplier。
public Supplier<SyndEntry> feedSupplier()
{
	return () -> {
		//Use the ROME framework directly to produce syndicated entries.
	}
}
这样做的好处是,我们可以在没有任何 Spring 知识的情况下开发 supplier,并且可以使用该环境提供的抽象或依赖 Spring Cloud Function 等框架直接部署到无服务器环境。
这本质上意味着,如果你是一名不熟悉 Spring Framework 的 Java 开发者,你仍然可以使用 java.util.function 包中定义的接口(例如 Function、Supplier 和 Consumer)来编写函数,只需提供业务逻辑即可。然后,我们可以将开发的这个 artifact 转换为 Spring Cloud Stream 应用程序,方法是添加 Spring Cloud Stream binder 依赖并使其成为一个 SpringBootApplication。通过提供一些配置属性,例如中间件目的地,我们可以立即获得将应用程序部署到 Spring Cloud Data Flow 等平台上的价值,Spring Cloud Data Flow 将应用程序作为数据管道的一部分进行编排。通过这种方式,我们编写的函数完全独立于任何 Spring 依赖,并且只在部署过程的最后阶段引入 Spring Cloud Stream、Spring Cloud Function 和 Spring Cloud Data Flow 等 Spring 组件。下图展示了这一思路。
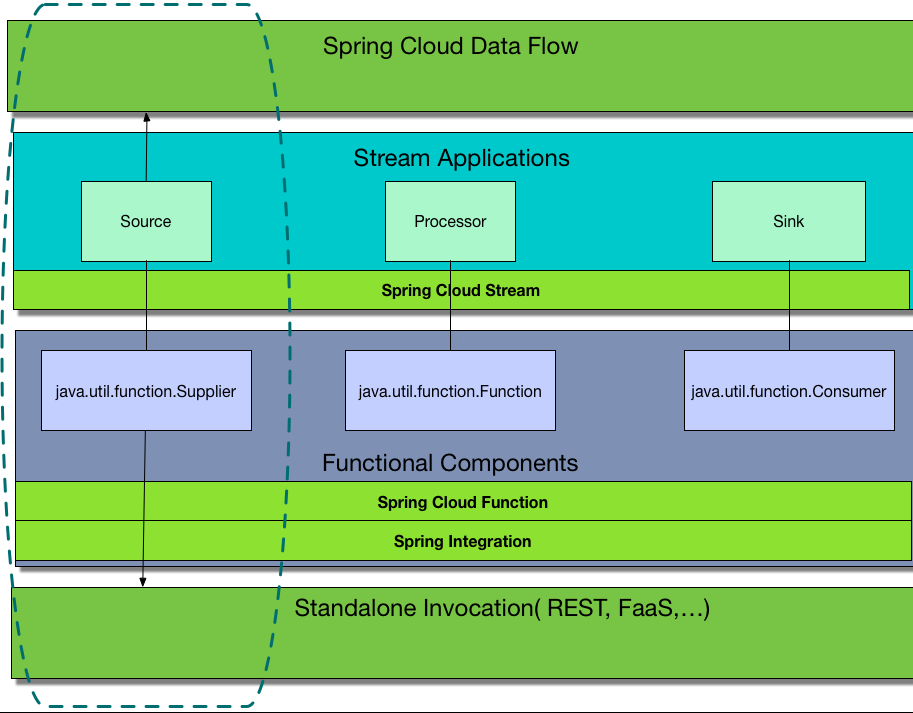
正如我们所见,函数组件可以独立调用,也可以在将其转换为 Spring Cloud Stream 应用程序后,作为 Spring Cloud Data Flow 管道的一部分进行调用。
虽然上述模型可能是一个很好的起点,但当我们开始直接使用 ROME 框架时,可能会很快意识到它涉及大量繁重的工作和更深入的库知识。出错的可能性很高,所以我们需要编写大量测试来验证我们的自定义实现按预期工作,并且所有边界情况都已覆盖。我们开始怀疑是否已经存在一些更简单的抽象。这样我们就无需编写任何 ROME 特定的代码,因为抽象层会处理所有的复杂细节。幸运的是,我们有一个解决方案。Spring Integration 为许多企业技术提供了大量 inbound 和 outbound 适配器。feed 适配器就是其中之一,其实现基于 ROME。事实上,我们在预打包的 stream-applications 中提供的许多函数组件都基于 Spring Integration 适配器。这些适配器已被广泛用于大量企业用例,并经过了严格的实战测试。但是,我们想要编写 supplier 的技术可能在 Spring Integration 中不可用。在这种情况下,正如我们上面看到的,我们当然可以自己编写代码,并从 supplier 中调用它。
如果你还没这样做,请 fork 并 clone stream applications 仓库。然后在 functions/supplier 下创建一个新的 feed-supplier 模块。使用现有的 supplier 之一作为模板进行指导。
在项目中添加以下 Spring Integration Feed 适配器依赖。这将引入 Spring Integration 的 feed 适配器以及任何其他传递依赖。
<dependency>
   <groupId>org.springframework.integration</groupId>
   <artifactId>spring-integration-feed</artifactId>
</dependency>
现在我们已经引入了核心依赖,接下来开始编写一些代码。由于函数预计在 Spring Boot 环境中使用,我们需要创建一个 ConfigurationProperties 类来驱动 supplier 函数的配置。它可能看起来像这样。
package org.springframework.cloud.fn.supplier.feed;

@ConfigurationProperties("feed.supplier")
public class FeedSupplierProperties {

/**
* Key used in metadata store to avoid duplicate read from the feed
*/
private String metadataKey;

/**
* Feed url.
*/
private URL feedUrl;

// rest is omitted
}
如我们所见,我们在所有属性上都使用了 feed.supplier 前缀。
接下来,我们创建一个基于 Spring 的配置类,在其中提供所有必需的组件。我们将逐步构建它。下面是该类的基本结构。
package org.springframework.cloud.fn.supplier.feed;
...
@Configuration
@EnableConfigurationProperties(FeedSupplierProperties.class)
public class FeedSupplierConfiguration {

}
将这些字段添加到类中。
private final ConcurrentMetadataStore metadataStore;

private final Resource resource;

private final FeedSupplierProperties feedSuppplierProperties;
关于这些字段的快速说明。Spring Integration 中的 Feed 适配器提供了一种功能,可以避免重复读取已经从订阅源中读取过的条目。我们上面定义的 metadataKey 属性用于此目的。它通过使用元数据存储来实现这一点。对于流行的数据库,有各种元数据存储可用。请包含以下依赖以使用内存中的简单元数据存储。
<dependency>
   <groupId>org.springframework.cloud.fn</groupId>
   <artifactId>metadata-store-common</artifactId>
   <version>${project.version}</version>
</dependency>
请注意,此要求特定于此 supplier,并非所有 suppliers 都需要它。
如果没有基于 HTTP(或 HTTPS)的 URL 可用(我们可以通过配置属性设置),用户可以提供一个 Resource bean 来读取订阅源。
让我们添加一个构造函数来使用这些字段。
FeedSupplierConfiguration(FeedSupplierProperties feedSupplierProperties,
                   ConcurrentMetadataStore metadataStore,
                   @Nullable Resource resource) {
  this.feedSuppplierProperties = feedSupplierProperties;
  this.metadataStore = metadataStore;
  this.resource = resource;
}
Resource 可以为空,因为大多数情况下我们可以直接将 URL 字符串作为配置属性传递,而无需提供 Resource bean。
Spring Integration Feed 适配器提供了 FeedEntryMessageSource,它是一个 MessageSource 实现。我们将在 supplier 中使用此消息源。让我们将其设置为 Spring Bean。下面的代码非常容易理解。
@Bean
public FeedEntryMessageSource feedEntryMessageSource() {
  final FeedEntryMessageSource feedEntryMessageSource = this.resource == null ? new FeedEntryMessageSource(this.feedSuppplierProperties.getFeedUrl(),
        this.feedSuppplierProperties.getMetadataKey()) :
       ...
  return feedEntryMessageSource;
}
现在我们已经准备好了 MessageSource bean,编写一个简单的 Supplier 并通过调用其 get 方法来以编程方式调用它相对容易。代码如下。
@Bean
public Supplier<Message<SyndEntry>> feedSupplier() {
  return () -> feedEntryMessageSource().receive();
}
我们可以将此 Supplier bean 注入到应用程序中,并通过编程方式调用 get 方法。当此 Supplier 在 Spring Cloud Stream 应用程序中使用时(我们稍后会看到),它将使用 Spring Cloud Stream 提供的默认轮询器,该轮询器默认每秒触发一次 supplier。此计划可以在轮询器中更改。
非响应式轮询方案看起来不错,但我们可能会问,如果我不想每隔一段时间就显式轮询,而是想以流式方式在消息源中数据可用时立即获取数据怎么办?嗯,我们有一个解决方案 - 开发一个响应式 supplier,一旦接收到数据,就立即发送。让我们看看详细信息。
在这里,Spring Integration 再次提供了一些我们可以用来将 FeedEntryMessageSource 转换为响应式发布者的抽象,如下所示。
@Bean
public Supplier<Flux<Message<SyndEntry>>> feedSupplier() {
  return () -> IntegrationReactiveUtils.messageSourceToFlux(feedEntryMessageSource());
}
您可能会注意到,此 supplier 返回的是 Flux<Message<SyndEntry>>,而不是像我们在最初的非响应式 supplier 中那样返回 Message<SyndEntry>,在非响应式 supplier 中,我们依赖于 supplier 的编程调用或某种其他轮询机制。
好的,很高兴我们有一个来自 Spring Integration 的 MessageSource,并且可以使用那个工具方法将其转换为 Flux。如果不存在这样的 MessageSource,而我们必须手动编写用于要为其编写响应式 style supplier 的系统的数据基本检索代码怎么办?对于这些情况,我们可以使用 Project Reactor 提供的各种工具,然后通过编程方式将数据提供给它们。总而言之,当我们编写响应式 streaming supplier 时,我们必须将数据作为 Flux 返回。
让我们为这个响应式 supplier 添加一个单元测试。我们可以使用RFC 4287 - Atom 联合格式中描述的 Atom 订阅源示例作为测试数据。将其包含在 src/test/resources 中。
这是测试类。
@SpringBootTest(properties = {"feed.supplier.feedUrl=classpath:atom.xml",
     "feed.supplier.metadataKey=feedTest" })
@DirtiesContext
public class FeedSupplierTests {

  @Autowired
  Supplier<Flux<Message<SyndEntry>>> feedSupplier;

  @Test
  public void testFromSampleRssFile() {
     final Flux<Message<SyndEntry>> messageFlux = feedSupplier.get();

     StepVerifier.create(messageFlux)
           .assertNext((message) -> {
              assertThat(message.getPayload().getTitle().trim()).isEqualTo("Atom draft-07 snapshot");
              assertThat(message.getPayload().getContents().size()).isEqualTo(1);
              assertThat(message.getPayload().getContents().get(0).getValue().contains("The Atom draft is finished.")).isTrue();
           })
           .thenCancel()
           .verify();
  }

  @SpringBootApplication
  static class FeedSupplierTestApplication {

  }

}
functions 项目在一个 Maven BOM 中聚合了所有可用的函数。将 feed-supplier 添加到此 BOM 中。如果你基于此函数生成 Spring Cloud Stream 应用程序,则主要需要这样做。
在这个过程的当前阶段,我们可以向仓库提交包含我们 supplier 的 pull request,但如果想从 supplier 生成基于 Spring Cloud Stream binder 的应用程序,请继续阅读。生成后,这些应用程序可以独立运行,也可以作为 Spring Cloud Data Flow 中数据编排管道的一部分运行。
请在 applications/source 下创建一个名为 feed-source 的新模块。正如我们在之前的博客中提到的,java.util.function.Supplier 被映射为 Spring Cloud Stream Source。
我们不需要在我们的 feed supplier 之上添加任何自定义代码,因为它本身就可以使用。然而,既然我们正在讨论 Spring Cloud Stream 应用程序,我们需要结合 supplier 函数使用测试 binder,以了解 supplier 如何与 Spring Cloud Stream 一起工作。
我们可以使用现有的 sources 之一作为模板来指导我们完成整个过程。我们甚至可以复制其中一个并逐步进行更改。
所有应用程序都使用了父 pom stream-applications-core,它引入了所有必要的测试依赖,例如上面提到的测试 binder。它还提供了负责生成基于 binder 应用程序的应用程序生成器插件的基础设施。
我们想强调的一点是,除非应用程序模块包含自定义代码,否则此模块仅成为一个生成基于 binder 的应用程序的应用程序生成器。换句话说,我们不会向其中添加一个带有 @SpringBootApplication 的类,而是为我们生成的。
添加以下依赖以使用测试 binder 进行测试
<dependencies>
   <dependency>
       <groupId>org.springframework.cloud.fn</groupId>
       <artifactId>feed-supplier</artifactId>
       <scope>test</scope>
   </dependency>
</dependencies>
现在我们可以添加一个测试来验证 feed-supplier 在 Spring Cloud Stream 中是否与测试 binder 一起工作。基本上,我们需要确保 supplier 通过测试 binder 生成数据,并将数据发送到测试 binder 上的目的地。
这是测试背后的基本思路
public class FeedSourceTests {

  @Test
  public void testFileSource() throws Exception {
     try (ConfigurableApplicationContext context = new SpringApplicationBuilder(
           TestChannelBinderConfiguration
                 .getCompleteConfiguration(FeedSourceTestApplication.class))
           .web(WebApplicationType.NONE)
           .run("--spring.cloud.function.definition=feedSupplier", "--feed.supplier.feedUrl=classpath:atom.xml", "--feed.supplier.metadataKey=feedTest")) {

        OutputDestination target = context.getBean(OutputDestination.class);
        Message<byte[]> sourceMessage = target.receive(10000);
        Object title = JsonPath.parse(new String(sourceMessage.getPayload())).read("$.title");
        assertThat(title).isEqualTo("Atom draft-07 snapshot");
     }
  }

  @SpringBootApplication
  @Import(FeedSupplierConfiguration.class)
  public static class FeedSourceTestApplication {

  }
}
该测试与我们为 supplier 添加的单元测试大致相似,但存在一个很大的区别。在 supplier 中,我们是直接调用它并验证生成的数据。在这里,我们不直接调用 supplier,而是由 Spring Cloud Stream 中的绑定机制自动为我们完成。我们从 outbound 目的地接收数据,然后进行验证。
测试通过后,就可以生成应用程序了。
默认情况下,该插件为 Spring Cloud Stream 中的 Kafka 和 Rabbit binder 生成应用程序。这在 stream-applications-core 的父 pom 中配置。如果需要为不同的 binder 定制生成,我们需要在那里进行更改。下面是应用程序生成器插件的配置。
<plugin>
   <groupId>org.springframework.cloud.stream.app.plugin</groupId>
   <artifactId>spring-cloud-stream-app-maven-plugin</artifactId>
   <configuration>
       <generatedApp>
           <name>feed</name>
           <type>source</type>
           <version>${project.version}</version>
           <configClass>org.springframework.cloud.fn.supplier.feed.FeedSupplierConfiguration.class</configClass>
       </generatedApp>
       <dependencies>
           <dependency>
               <groupId>org.springframework.cloud.fn</groupId>
               <artifactId>feed-supplier</artifactId>
           </dependency>
           <dependency>
               <groupId>org.springframework.cloud.stream.app</groupId>
               <artifactId>stream-applications-composite-function-support</artifactId>
               <version>${stream-apps-core.version}</version>
           </dependency>
       </dependencies>
   </configuration>
</plugin>
让我们快速回顾一些细节。我们要求插件创建一个名为 feed-source 的应用程序,并希望它使用我们上面开发的 Supplier 作为主配置类。在插件的 dependencies 部分中,我们还需要添加应用程序所需的任何依赖,在本例中是 feed-supplier。我们需要将所有 processor 函数添加到所有生成的 source 应用程序中。这是因为我们可以将 source 与其他 processors 组合,而无需将它们作为单独的微服务运行,正如我们在之前的博客中看到的那样。关于 source 与 processors 的函数组合的更多详细信息也请参见此处。这就是为什么我们在插件的 dependencies 部分中添加 stream-applications-composite-function-support 依赖的原因。
构建应用程序模块,我们将在 apps 文件夹中看到基于 binder 的应用程序。它们将命名为 feed-source-kafka 和 feed-source-rabbit。我们可以进入其中任何一个应用程序并构建它,然后将其用作独立应用程序或作为 Spring Cloud Data Flow 管道的一部分。
在这篇博客文章中,我们看到了开发、测试和贡献 supplier/Spring Cloud Stream 应用程序组合的整个过程。请按照本文概述的步骤编写您自己的 suppliers 和 sources。如果您已经完成了,请考虑将其贡献回仓库。
本文是本系列博客的第三篇,该系列将涵盖许多相关主题。在接下来的几周内,敬请期待更多深入探讨和重点主题。在本系列的下一篇博客中,我们将像本文介绍如何编写新的 Supplier 和 Source 一样,编写一个 Consumer 函数,然后从中生成一个 Sink 应用程序。