
领先一步
VMware 提供培训和认证,助你快速提升。
了解更多各位 Spring 爱好者,大家好!欢迎来到新一期的 Spring 技巧!在本期中,我们将重新探讨在之前两个视频中涉及过的两个主题(分布式追踪和指标收集),但这次将结合出色的 Tanzu Wavefront 可观测性平台。
正如前面提到的,两个视频中的第一个追溯到 2017 年初,探讨了使用 Spring Cloud Sleuth 和 OpenZipkin 进行分布式追踪。Spring Cloud Sleuth 是一个用于捕获消息在节点之间流动的抽象。它有助于你了解消息如何在系统中传递。Spring Cloud Sleuth 集成到 Spring Boot 应用中所有常见的入口和出口点。无论是使用 Restteplat、响应式 WebClient 还是 Spring Cloud Feign 发起 HTTP 请求?它都工作。接收传统(基于 Servlet)或使用 Spring 构建的响应式 HTTP 端点的 HTTP 请求?它都工作。使用 Spring Cloud Stream 或 Spring Integration 发送或接收消息?是的。你猜对了。它就是能工作。而且你什么都不用做。
只需将 Spring Cloud Sleuth starter 添加到 classpath,Spring Cloud Sleuth 就会完成其余的工作。它可以将捕获的信息转发到带外追踪服务器,例如 OpenZipkin。有些甚至提供了兼容 Zipkin 的代理,比如 Google Cloud StackDriver trace。我喜欢最后一点,因为这几乎感觉我们回到了起点。记住,Zipkin 的灵感来源于(以及其他方面)谷歌的 dapper 白皮书。很高兴我们可以反过来使用 Zipkin 与谷歌云的追踪基础设施进行通信。分布式追踪非常适合当你想要深入了解单个请求进出系统的具体细节时使用。
第二个视频来自 2018 年初,探讨了使用 Micrometer 收集指标。
Micrometer 是一个抽象层,用于捕获关于应用程序的指标(统计数据),这些指标可以通过 Spring Boot actuator 的 /actuator/metrics 端点获取,或者转发到像 Wavefront 这样的时间序列数据库。Micrometer 还可以与许多其他时间序列数据库通信,如 AppOptics、Azure Monitor、Netflix Atlas、CloudWatch、Datadog、Dynatrace、Elastic、Ganglia、Graphite、Humio、Influx/Telegraf、JMX、KairosDB、New Relic、Prometheus、SignalFx、Google Stackdriver、StatsD。当你想捕获统计数据时,指标非常有用,例如关于特定 HTTP 端点被访问频率的总计数字,或者 HTTP 端点返回特定状态码或响应特定 HTTP 谓词的频率。
这是个快速回顾。要更深入地了解这两者,我建议你参考提到的那两个 Spring 技巧视频。这就是它们存在的意义!Wavefront 的妙之处在于,在本期中你无需与这些项目的 API 进行交互,因为正如我们将要看到的,Wavefront Spring Boot 集成 就是能工作。这并不令人意外:Spring Boot 团队一直在努力使 Wavefront 集成无缝工作。Wavefront 还集成了 大量 其他不同的平台、运行时和项目。
注意:我将支持的其他集成的看似无尽的列表拼接到了一张巨大的截图中,你可以在本博客的底部找到它。那张图片将会比博客本身长大约十倍。
让我们使用 Spring Initializr 构建一个新项目。你必须使用 Spring Boot 2.3.M4 或更高版本。选择 R2DBC、PostgreSQL、Reactive Web、Spring Cloud Sleuth 和 Lombok。点击 Generate,解压生成的文件。在我写这篇文章时,使用 Spring Cloud Hoxton SR3 已经足够好了。不需要 snapshots。另外,我们需要添加 Wavefront starter 本身。将以下依赖项添加到 pom.xml 中。
    <dependency>
        <groupId>com.wavefront</groupId>
        <artifactId>wavefront-spring-boot-starter</artifactId>
        <version>2.0.0-SNAPSHOT</version>
    </dependency>
Wavefront Spring Boot starter 是一个 SNAPSHOT 依赖项——如果不是敢于走在边缘,那还算什么 Spring 技巧视频呢!在撰写本文时,该依赖项位于 Sonatype SNAPSHOTS 仓库中。我的构建中需要包含以下 Spring 和 Sonatype 仓库。不过,谁知道呢?也许当你读到这篇文章时,一切都已经 GA(通用可用)了。在这些美好的地方,事情变化得很快!
    <repositories>
        <repository>
            <id>sonatype-snapshots</id>
            <name>Sonatype Snapshots</name>
            <url>https://oss.sonatype.org/content/repositories/snapshots/</url>
            <snapshots>
                <enabled>true</enabled>
            </snapshots>
        </repository>
        <repository>
            <id>spring-milestones</id>
            <name>Spring Milestones</name>
            <url>https://repo.spring.io/milestone</url>
        </repository>
        <repository>
            <id>spring-snapshots</id>
            <name>Spring Snapshots</name>
            <url>https://repo.spring.io/snapshot</url>
            <snapshots>
                <enabled>true</enabled>
            </snapshots>
        </repository>
    </repositories>
    <pluginRepositories>
        <pluginRepository>
            <id>spring-milestones</id>
            <name>Spring Milestones</name>
            <url>https://repo.spring.io/milestone</url>
        </pluginRepository>
        <pluginRepository>
            <id>spring-snapshots</id>
            <name>Spring Snapshots</name>
            <url>https://repo.spring.io/snapshot</url>
            <snapshots>
                <enabled>true</enabled>
            </snapshots>
        </pluginRepository>
    </pluginRepositories>
完成所有这些后,将项目导入你喜欢的 IDE。
该应用程序是一个典型的响应式 Spring Boot 应用程序,在观看了这么多期其他 Spring 技巧之后,你无疑已经熟悉了 关于函数式响应式 HTTP endpints、Spring Data R2DBC、测试响应式服务 等主题。以下是代码。
package com.example.wavefront;

import lombok.AllArgsConstructor;
import lombok.Data;
import lombok.NoArgsConstructor;
import org.springframework.boot.ApplicationRunner;
import org.springframework.boot.SpringApplication;
import org.springframework.boot.autoconfigure.SpringBootApplication;
import org.springframework.context.annotation.Bean;
import org.springframework.data.annotation.Id;
import org.springframework.data.repository.reactive.ReactiveCrudRepository;
import org.springframework.web.reactive.function.server.RouterFunction;
import org.springframework.web.reactive.function.server.ServerResponse;
import reactor.core.publisher.Flux;

import static org.springframework.web.reactive.function.server.RouterFunctions.route;
import static org.springframework.web.reactive.function.server.ServerResponse.ok;

@SpringBootApplication
public class WavefrontApplication {

    public static void main(String[] args) {
        SpringApplication.run(WavefrontApplication.class, args);
    }

    @Bean
    RouterFunction<ServerResponse> routes(ReservationRepository rr) {
        return route()
                .GET("/reservations", r -> ok().body(rr.findAll(), Reservation.class))
                .GET("/hello", r -> ok().bodyValue("Hi, Spring fans!"))
                .build();

    }

    @Bean
    ApplicationRunner runner(ReservationRepository reservationRepository) {
        return args -> {

            var data = Flux
                    .just("A", "B", "C", "D")
                    .map(name -> new Reservation(null, name))
                    .flatMap(reservationRepository::save);

            reservationRepository
                    .deleteAll()
                    .thenMany(data)
                    .thenMany(reservationRepository.findAll())
                    .subscribe(System.out::println);
        };
    }
}

interface ReservationRepository extends ReactiveCrudRepository<Reservation, String> {
}

@Data
@AllArgsConstructor
@NoArgsConstructor
class Reservation {

    @Id
    private String id;
    private String name;
}
我们需要在 src/main/resources/application.properties 中指定 PostgreSQL 数据库的一些配置信息。
spring.r2dbc.url=r2dbc:postgresql:///orders
spring.r2dbc.username=orders
spring.r2dbc.password=orders
我们还需要在 src/main/resources/application.properties 中指定我们的应用程序如何向 Wavefront 标识自己。Wavefront 可以观测多个应用程序。一个应用程序反过来可以包含多个服务。应用程序名称是服务的逻辑分组。对于我们的应用程序,名称将是 spring-tips,服务名称将是 reservations。
wavefront.application.name=spring-tips
wavefront.application.service=reservations
然后……就是这样!在你的 IDE 中或使用命令行 mvn spring-boot:run 启动应用程序。你会看到应用程序启动并在控制台上显示一些信息,类似这样。
...

To share this account, make sure the following is added to your configuration:

    management.metrics.export.wavefront.api-token=58e749b5-ee60-4c0b-988e-458c6cb77b32
    management.metrics.export.wavefront.uri=https://wavefront.surf

Connect to your Wavefront dashboard using this one-time use link:
https://wavefront.surf/us/cY69hp561D

...
是的。就是这样。当 Wavefront Spring Boot starter 启动时,它会为你的应用程序协商一个 token。因此,应用程序启动时,你的仪表板就已经准备就绪并等待你了。Spring Boot starter 甚至很友好地将 Wavefront token 捕获到 ~/.wavefront_token 中。后续运行将读取该数据。或者,你也可以使用控制台打印出的 Spring Boot 属性,它也会优先使用这些属性。
你可能不希望将 token 提交到你的 git 仓库中。相反,最好使用环境变量或 Spring Cloud Config Server。想了解更多关于配置的信息?请参阅 这个 Spring 技巧视频 关于配置的内容。
记下最后一个 URL,供以后参考。但首先,打开你的浏览器,访问一些端点,https://:8080/reservations 和 https://:8080/hello。在浏览器中分别调用它们六七次。
现在,访问那个 Wavefront URL,你应该会看到一个包含你的应用程序数据的仪表板。如果你没有看到,请稍等片刻。收集应用程序数据并显示需要几分钟时间。
你会立刻看到 Wavefront 已经捕获了关于你的应用程序的指标,包括应用程序层面的(例如,它了解你的 HTTP 请求)以及 JVM 层面的(例如,它了解你的 JVM 内存使用情况)。

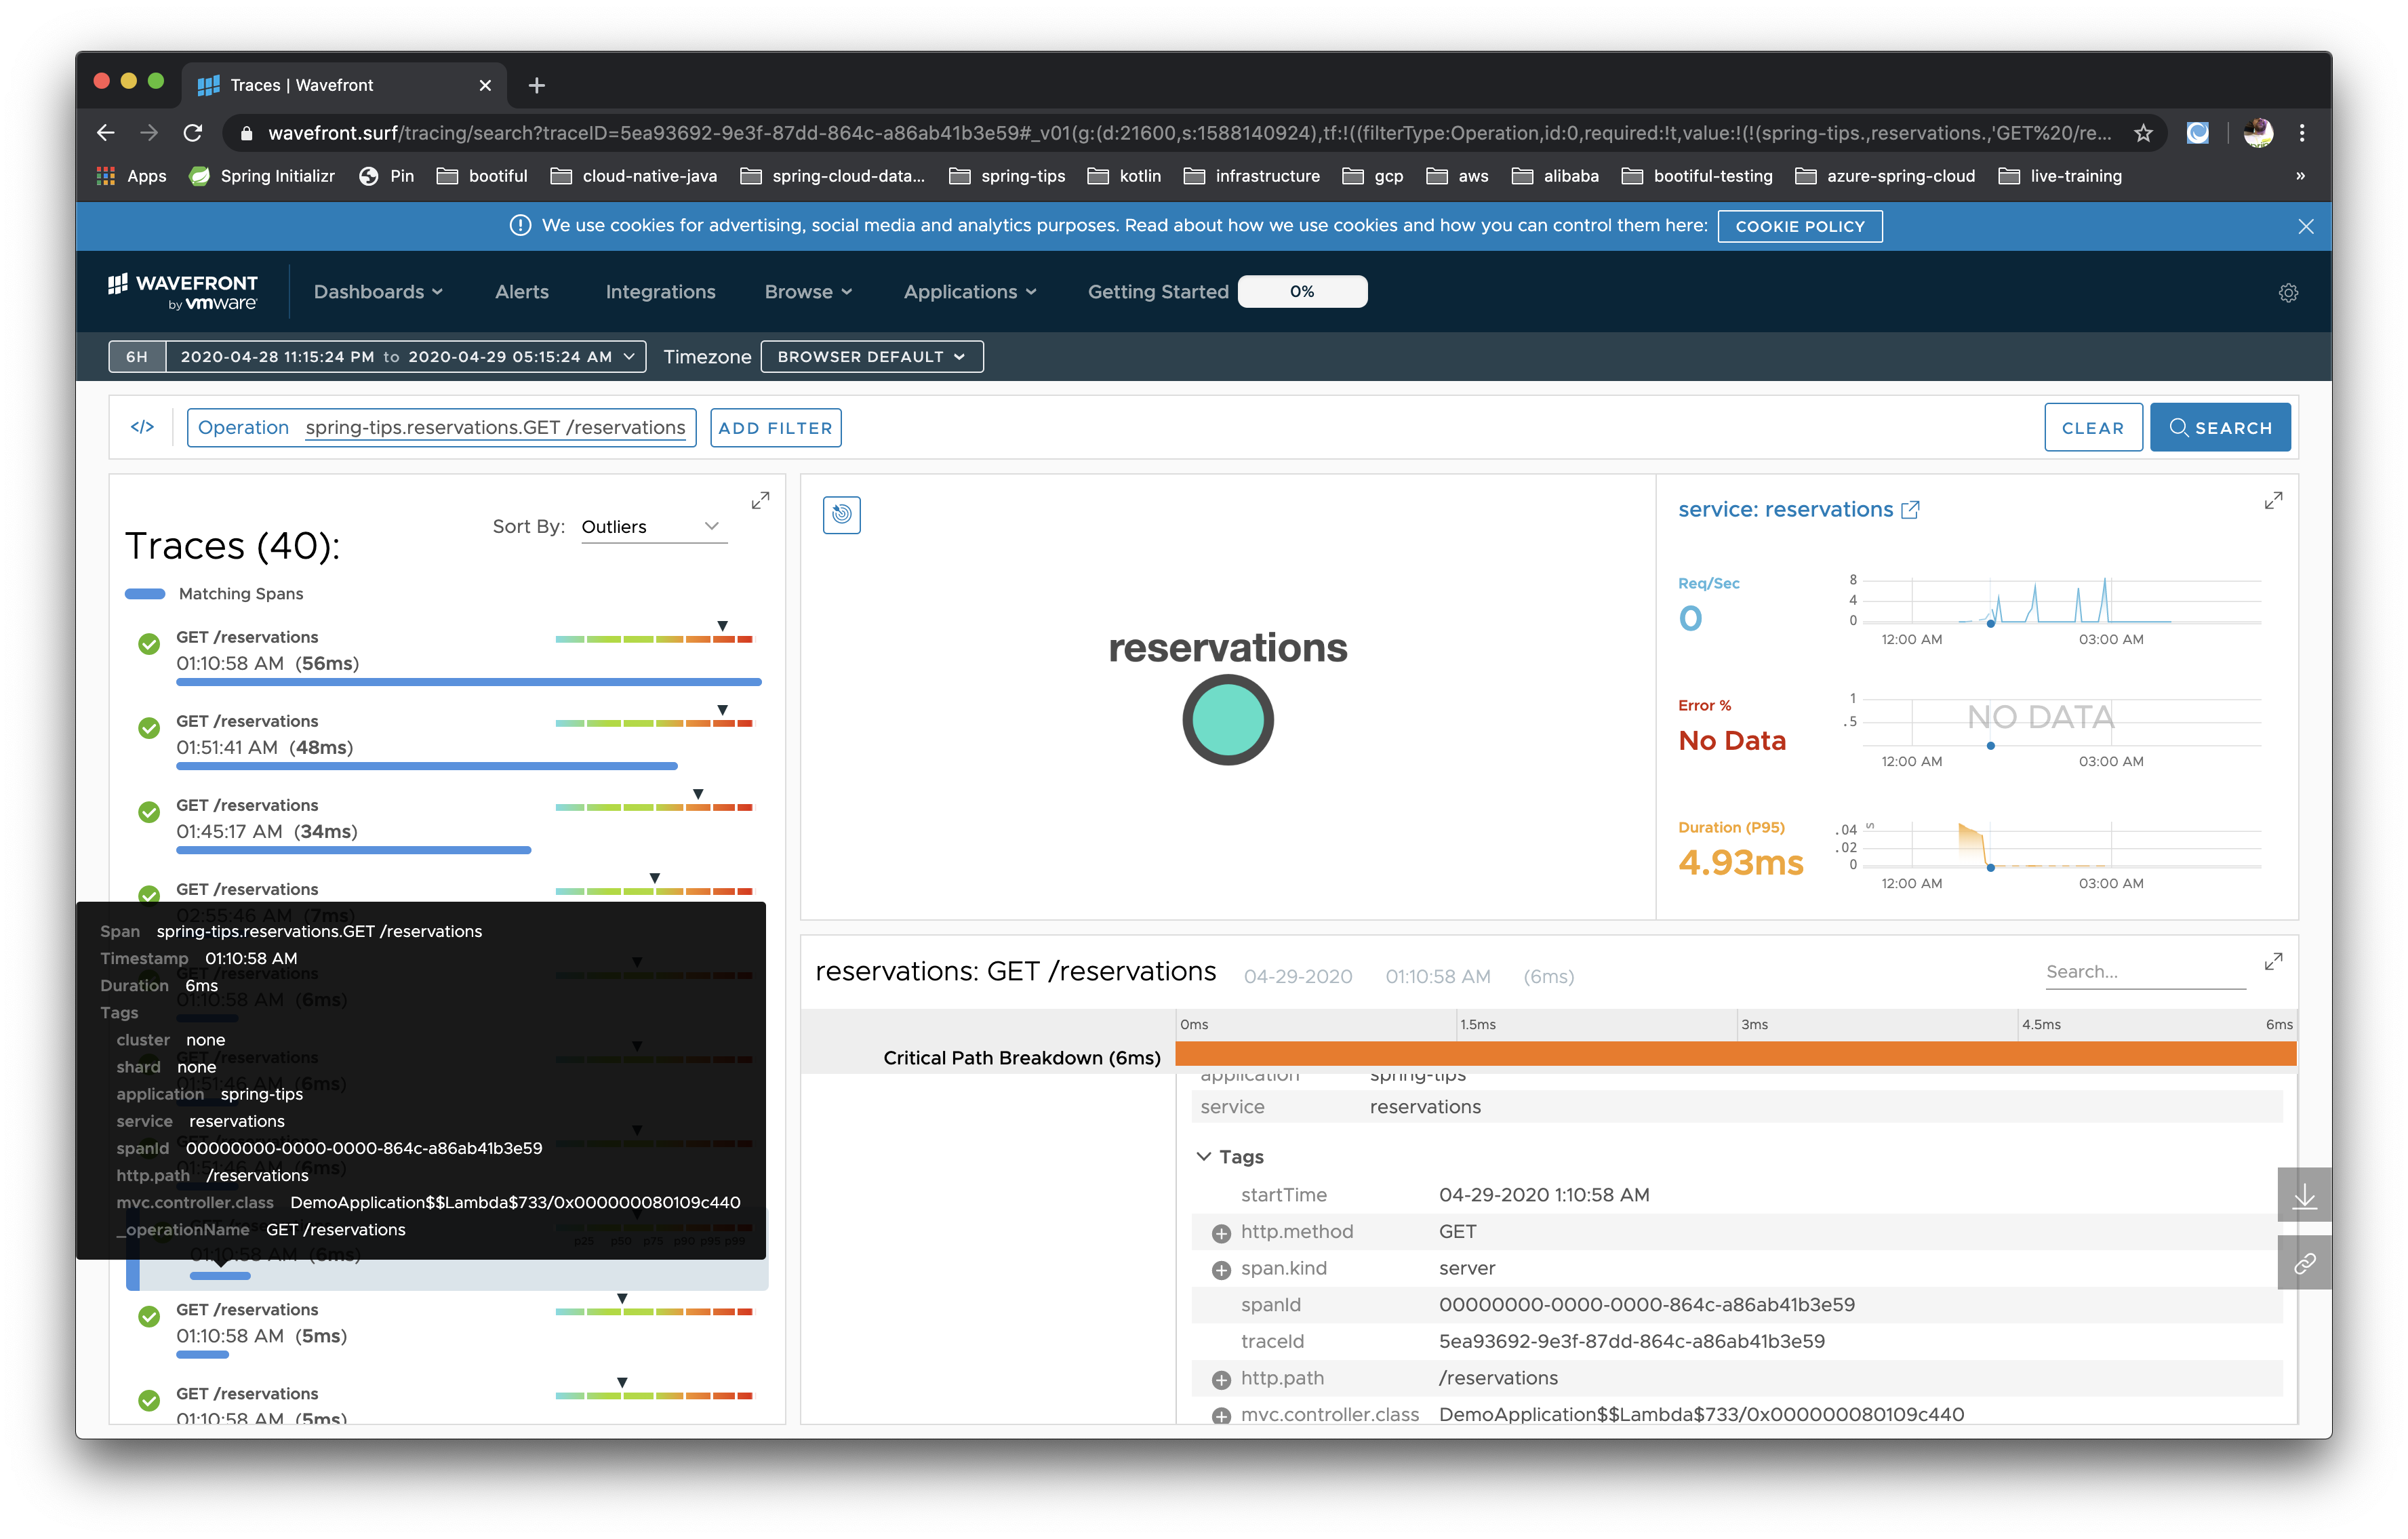
点击其中的一个 HTTP 请求,或者导航到 Application > Traces,你就可以深入查看应用程序的追踪信息,就像这样。那里也有大量的信息。
到目前为止我展示的一切都只是开箱即用的功能。真正的强大之处在于定制和集成。你可以创建自定义仪表板来显示对你重要的各种信息。绘制有用的业务指标图。使用图表、时间序列等。而且,一旦你弄清楚哪些数据是需要采取行动的,以及如何最好地情境化数据,那么安装集成来在需要采取行动时提醒你就变得轻而易举了。
说到集成,我承诺过会向你展示一些其他的可用集成。所以,来了,你的禅意时刻:那些疯狂的其他集成列表,为那些不使用 Spring Boot 的少数派(哈?)。

还在看?……为什么?快去!你还有别的事要做,还有要享受的生产环境部署,还有要衡量的增长。把你今天在这里学到的东西应用起来,将 Wavefront 集成到你的应用程序中。如果你正在使用 Tanzu 企业级 Kubernetes Grid (Kubernetes)、Tanzu Application Service (Cloud Foundry) 或 Azure Spring Cloud,那么这应该是一个特别诱人的机会。终于,一个可观测性平台能够像你的基于 Spring Boot 的微服务一样扩展。所以,去吧。去试试 Wavefront。更快、更安全地投入生产环境。