
领先一步
VMware 提供培训和认证,助您加速进步。
了解更多speaker: Josh Long (@starbuxman)
Spring 爱好者们,大家好!在这一期的 Spring Tips 中,我们将探讨一个我非常喜欢的话题:集成!是的,您可能还记得《Spring Tips》的第一期就是关于 Spring Integration 的。如果您还没有看过那一期,建议您去看一下。因此,虽然我们不会重温 Spring Integration 的基础知识,但我们将深入探讨 Spring Integration 支持的一个领域:FTP。FTP 的核心是文件同步。广义上讲,在企业应用集成 (EAI) 领域,我们有四种类型的集成:文件同步、RPC、数据库同步和消息传递。
文件同步肯定不是大多数人想到云原生应用时会联想到的,但您可能会惊讶地发现,金融领域的很大一部分都依赖于文件同步(FTP、SFTP、AS2、FTPS、NFS、SMB 等)集成。当然,它们中的大多数使用了更安全的变体,但重点仍然是有效的。在本视频中,我们将探讨如何使用 Spring Integration 的 FTP 支持,一旦您理解了这一点,就可以很容易地将其应用于其他变体。
请允许我在这里稍微自夸一下:我以为我了解 Spring Integration 的 FTP 支持所需要知道的一切,因为十多年前,我在完善 Iwein Fuld 的原始原型代码中扮演了重要角色,并且贡献了最初的 FTPS 和 SFTP 适配器。在随后的十年里,毫不令人意外的是,Spring Integration 团队增加了大量新功能,并修复了我原始代码中的所有 bug!我非常喜欢引入的这些新功能。
所以,首先要做的是:我们需要设置一个 FTP 服务器。Spring Integration 的大部分支持都是作为客户端与已安装的 FTP 服务器配合使用。因此,您使用哪种 FTP 服务器并不重要。不过,我建议您使用 Apache FTPServer 项目。它是 Apache Mina 项目的一个子项目,Apache Mina 项目是 Netty 项目的前身。Apache FTP Server 是一个高度可伸缩、轻量级、纯 Java 实现的 FTP 协议服务器。而且,您可以轻松地将其嵌入到 Spring 应用中。我已经在本视频的 Github 仓库中这样做了。我定义了一个自定义的 UserManager 类来管理 FTP 用户账户。这个自定义的 UserManager 与本地 PostgreSQL 数据库中的一个简单表 ftp_user 交互,该表的模式定义如下列:
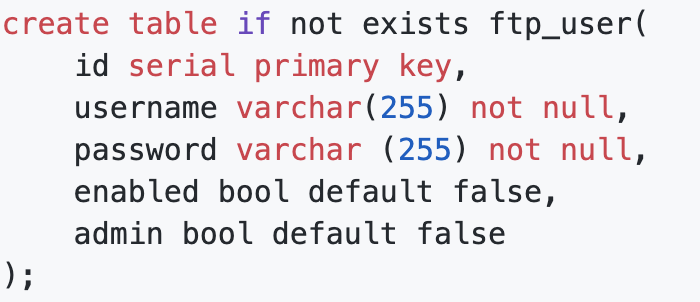
我在其中设置了两个用户:jlong 和 grussell,它们的密码都是 pw。我将这两个记录的 enabled 和 admin 都设置为 true。稍后我们会用到这两个账户,所以请确保将它们插入到表中,就像这样。
insert into ftp_user(username, password, enabled, admin) values ('jlong', 'pw', true, true);
insert into ftp_user(username, password, enabled, admin) values ('grussell', 'pw', true, true);
我不会在这里完整地重印 FTP 服务器的代码。如果您想仔细阅读,我建议您查看 FtpServerConfiguration 和 FtpUserManager。
在大多数情况下,我们无法更改 FTP 服务器。如果想收到远程文件系统任何更改的通知,我们的客户端需要连接、扫描目录,并与早期已知状态进行比较。本质上,客户端计算差值并发布一个事件。但是,如果 FTP 服务器在发生某些事情时能够广播一个事件,那不是很好吗?这样,就可以毫无疑问地知道发生了什么。而且我们可以确定观察到了每一个变化。如果我们使用任何其他 FTP 服务器,这更多地是一种愿望,而不是可能性。但是,由于我们使用的是 Apache FTP Server,Spring Integration 为我们提供了一些有趣的可能性。我们可以安装一个 FTPlet,有点像一个过滤器,它将 FTP 服务器上的任何重要事件作为 ApplicationContext 事件广播出去。然后,我们可以使用 Spring Integration 将感兴趣的事件发布为消息,以便在 Spring Integration 中处理。这个功能是 Spring Integration 中的一个新特性。
package ftp;

import lombok.extern.log4j.Log4j2;
import org.springframework.context.annotation.Bean;
import org.springframework.context.annotation.Configuration;
import org.springframework.integration.dsl.IntegrationFlow;
import org.springframework.integration.dsl.IntegrationFlows;
import org.springframework.integration.dsl.MessageChannels;
import org.springframework.integration.event.inbound.ApplicationEventListeningMessageProducer;
import org.springframework.integration.ftp.server.ApacheMinaFtpEvent;
import org.springframework.integration.ftp.server.ApacheMinaFtplet;
import org.springframework.integration.handler.GenericHandler;
import org.springframework.messaging.MessageChannel;

@Log4j2
@Configuration
class IntegrationConfiguration {

	@Bean
	ApacheMinaFtplet apacheMinaFtplet() {
		return new ApacheMinaFtplet();
	}

	@Bean
	MessageChannel eventsChannel() {
		return MessageChannels.direct().get();
	}

	@Bean
	IntegrationFlow integrationFlow() {
		return IntegrationFlows.from(this.eventsChannel())
			.handle((GenericHandler<ApacheMinaFtpEvent>) (apacheMinaFtpEvent, messageHeaders) -> {
                log.info("new event: " + apacheMinaFtpEvent.getClass().getName() +
                     ':' + apacheMinaFtpEvent.getSession());
				return null;
			})
			.get();
	}

	@Bean
	ApplicationEventListeningMessageProducer applicationEventListeningMessageProducer() {
		var producer = new ApplicationEventListeningMessageProducer();
		producer.setEventTypes(ApacheMinaFtpEvent.class);
		producer.setOutputChannel(eventsChannel());
		return producer;
	}
}
这个例子建立了一个 Spring Integration 消息流,它监听相关的事件并将它们记录下来。显然,我们对这些新信息做得不够多,但要记住的是......我们完全可以!这里有很多机会。我们可以通过 Apache Kafka、RabbitMQ 或 JMS 发布事件,供其他节点响应。我们可以发送一封电子邮件邀请某人参与某个工作流程。可能性是无限的!
现在,我们有一个运行在端口 7777 上的工作服务器,我们可以使用客户端连接。我使用 Filezilla。无论您使用什么客户端,尝试登录运行中的 FTP 服务器,主机为 localhost,端口为 7777,用户为 jlong,密码为 pw。上传一个文件、重命名文件等等,然后查看您应用的控制台,您会看到活动以事件的形式反映出来。
我们已经有了一个可以工作的服务器。现在来看看 Spring Integration 如何充当您的服务的客户端。我们将从最简单的抽象开始,逐步深入到更复杂的功能。在 Spring Initializr 上创建一个新项目,添加 Lombok、Spring Integration,并选择最新版本的 Java。然后点击 Generate 并在您的 IDE 中打开项目。
我们将使用前面定义的两个账户。让我们在 application.properties 中配置它们。
##
## Josh
ftp1.username=jlong
ftp1.password=pw
ftp1.port=7777
ftp1.host=localhost
##
## Gary
ftp2.username=grussell
ftp2.password=pw
ftp2.port=7777
ftp2.host=localhost
FtpRemoteFileTemplate与 FTP 服务器交互的最简单方法是使用 Spring Integration 中提供的非常便利的 FtpRemoteFileTemplate。这里有一个例子。第一个例子定义了一个 DefaultFtpSessionFactory,用于建立到其中一个 FTP 账户的连接。然后我们使用这个 DefaultFtpSessionFactory 定义一个 FtpRemoteFileTemplate。接着,我们定义一个初始化器,它使用这个 FtpRemoteFileTemplate 从远程文件系统读取文件 hello.txt 到本地文件 $HOME/Desktop/hello-local.txt。再简单不过了!
package com.example.integration;

import lombok.extern.log4j.Log4j2;
import org.springframework.beans.factory.InitializingBean;
import org.springframework.beans.factory.annotation.Value;
import org.springframework.context.annotation.Bean;
import org.springframework.context.annotation.Configuration;
import org.springframework.context.annotation.Profile;
import org.springframework.integration.ftp.session.DefaultFtpSessionFactory;
import org.springframework.integration.ftp.session.FtpRemoteFileTemplate;

import java.io.File;
import java.io.FileOutputStream;

@Log4j2
@Configuration
class FtpTemplateConfiguration {

	@Bean
	InitializingBean initializingBean(FtpRemoteFileTemplate template) {
		return () -> template
			.execute(session -> {
				var file = new File(new File(System.getProperty("user.home"), "Desktop"), "hello-local.txt");
				try (var fout = new FileOutputStream(file)) {
					session.read("hello.txt", fout);
				}
				log.info("read " + file.getAbsolutePath());
				return null;
			});
	}

	@Bean
	DefaultFtpSessionFactory defaultFtpSessionFactory(
		@Value("${ftp1.username}") String username,
		@Value("${ftp1.password}") String pw,
		@Value("${ftp1.host}") String host,
		@Value("${ftp1.port}") int port) {
		DefaultFtpSessionFactory defaultFtpSessionFactory = new DefaultFtpSessionFactory();
		defaultFtpSessionFactory.setPassword(pw);
		defaultFtpSessionFactory.setUsername(username);
		defaultFtpSessionFactory.setHost(host);
		defaultFtpSessionFactory.setPort(port);
		return defaultFtpSessionFactory;
	}

	@Bean
	FtpRemoteFileTemplate ftpRemoteFileTemplate(DefaultFtpSessionFactory dsf) {
		return new FtpRemoteFileTemplate(dsf);
	}
}
下一个例子展示了如何使用 FTP 入站适配器,以便在远程文件系统出现新文件时接收新的 Message<File>。入站或出站适配器是单向消息组件。入站适配器将来自远程系统的事件转换为新的消息,这些消息被传递到 Spring Integration 流中。出站适配器将 Spring Integration Message<T> 转换为远程系统中的事件。在本例中,当远程文件系统出现新文件时,FTP 入站适配器会将一个 Message<T> 发布到 Spring Integration 代码中。
和之前一样,我们配置一个 DefaultFtpSessionFactory。然后,我们配置一个 FTP 入站适配器,当服务器上出现任何匹配掩码 .txt 的文件时,它会自动同步远程文件系统。入站适配器获取远程文件,将其移动到本地目录,然后发布一个 Message<File>,我们可以对它进行任何操作。在这里,我只是简单地记录了消息。试一试吧!上传一个文件 foo.txt 到 FTP 服务器,然后观察——不到一秒钟后——它被下载并存储在本地文件系统下的 $HOME/Desktop/local 目录中。
package com.example.integration;

import lombok.extern.log4j.Log4j2;
import org.springframework.beans.factory.annotation.Value;
import org.springframework.context.annotation.Bean;
import org.springframework.context.annotation.Configuration;
import org.springframework.context.annotation.Profile;
import org.springframework.integration.dsl.IntegrationFlow;
import org.springframework.integration.dsl.IntegrationFlows;
import org.springframework.integration.ftp.dsl.Ftp;
import org.springframework.integration.ftp.session.DefaultFtpSessionFactory;

import java.io.File;
import java.util.concurrent.TimeUnit;

@Log4j2
@Configuration
class InboundConfiguration {

	@Bean
	DefaultFtpSessionFactory defaultFtpSessionFactory(
		@Value("${ftp1.username}") String username,
		@Value("${ftp1.password}") String pw,
		@Value("${ftp1.host}") String host,
		@Value("${ftp1.port}") int port) {
		DefaultFtpSessionFactory defaultFtpSessionFactory = new DefaultFtpSessionFactory();
		defaultFtpSessionFactory.setPassword(pw);
		defaultFtpSessionFactory.setUsername(username);
		defaultFtpSessionFactory.setHost(host);
		defaultFtpSessionFactory.setPort(port);
		return defaultFtpSessionFactory;
	}

	@Bean
	IntegrationFlow inbound(DefaultFtpSessionFactory ftpSf) {
		var localDirectory = new File(new File(System.getProperty("user.home"), "Desktop"), "local");
		var spec = Ftp
			.inboundAdapter(ftpSf)
			.autoCreateLocalDirectory(true)
			.patternFilter("*.txt")
			.localDirectory(localDirectory);
		return IntegrationFlows
			.from(spec, pc -> pc.poller(pm -> pm.fixedRate(1000, TimeUnit.MILLISECONDS)))
			.handle((file, messageHeaders) -> {
				log.info("new file: " + file + ".");
				messageHeaders.forEach((k, v) -> log.info(k + ':' + v));
				return null;
			})
			.get();
	}
}
现在,最后一站,让我们看看 Spring Integration 的 FTP 网关。在 Spring Integration 中,网关是一个组件,它将数据发送出去(到远程服务),然后获取响应并将其带回 Spring Integration 流中。或者,网关也可以接收来自远程系统的传入请求,将其带入 Spring Integration 流中,然后再次发送响应出去。无论哪种方式,网关都是一个双向消息组件。在本例中,FTP 网关接收 Spring Integration Message<T>s,将其发送到 FTP 服务器并上传,上传完成后,将响应(至少是确认)发送回 Spring Integration 代码中。
如果这就是我们所做的一切,那么它本身就很有用。但是,对于最后一个例子,我想根据一些条件有选择地将文件上传到两个 FTP 服务器账户中的一个。您可以想象一下这种情况。一个 HTTP 请求进来,它被转换为一个 Message<T> 进入 Spring Integration 流,然后流向网关。唯一的问题是:数据应该上传到哪个账户?如果本来要给 John 的文件上传到了 Jane 的账户,Jane 可能不会高兴。
我们将使用一个 DelegatingSessionFactory<FTPFile>。DelegatingSessionFactory<FTPFile> 有两个构造函数。一个接受一个 SessionFactoryLocator,您可以使用它在运行时决定使用哪个 FTP 账户。另一个接受一个 Map<String, SessionFactory>,这反过来又会生成一个 SessionFactoryLocator,它会查看传入消息的某个属性(由您决定是哪个),并将其用作 Map 中的查找键。
我们需要一种方法来启动管道,所以我创建了一个简单的 HTTP 端点,它接受一个 HTTP POST 消息,并使用一个路径变量来建立一个键,然后将这个键发送到集成流中。集成流有三个步骤。第一阶段查看传入消息并为 DelegatingSessionFactory 配置线程本地键,然后将消息转发到网关,网关负责将文件上传到远程文件系统,接着将上传的响应转发给另一个组件,该组件负责清除线程本地键。
package com.example.integration;

import org.apache.commons.net.ftp.FTPFile;
import org.springframework.beans.factory.annotation.Value;
import org.springframework.context.annotation.Bean;
import org.springframework.context.annotation.Configuration;
import org.springframework.context.annotation.Profile;
import org.springframework.expression.common.LiteralExpression;
import org.springframework.integration.dsl.IntegrationFlow;
import org.springframework.integration.dsl.MessageChannels;
import org.springframework.integration.file.remote.gateway.AbstractRemoteFileOutboundGateway;
import org.springframework.integration.file.remote.session.DelegatingSessionFactory;
import org.springframework.integration.file.support.FileExistsMode;
import org.springframework.integration.ftp.dsl.Ftp;
import org.springframework.integration.ftp.session.DefaultFtpSessionFactory;
import org.springframework.integration.ftp.session.FtpRemoteFileTemplate;
import org.springframework.integration.handler.GenericHandler;
import org.springframework.messaging.MessageChannel;
import org.springframework.messaging.support.MessageBuilder;
import org.springframework.web.servlet.function.RouterFunction;
import org.springframework.web.servlet.function.ServerResponse;

import java.util.Map;

import static org.springframework.web.servlet.function.RouterFunctions.route;

@Configuration
@Profile("gateway")
class GatewayConfiguration {

	@Bean
	MessageChannel incoming() {
		return MessageChannels.direct().get();
	}

	@Bean
	IntegrationFlow gateway(
		FtpRemoteFileTemplate template,
		DelegatingSessionFactory<FTPFile> dsf) {
		return f -> f
			.channel(incoming())
			.handle((GenericHandler<Object>) (key, messageHeaders) -> {
				dsf.setThreadKey(key);
				return key;
			})
			.handle(Ftp
				.outboundGateway(template, AbstractRemoteFileOutboundGateway.Command.PUT, "payload")
				.fileExistsMode(FileExistsMode.IGNORE)
				.options(AbstractRemoteFileOutboundGateway.Option.RECURSIVE)
			)
			.handle((GenericHandler<Object>) (key, messageHeaders) -> {
				dsf.clearThreadKey();
				return null;
			});
	}

	@Bean
	DelegatingSessionFactory<FTPFile> dsf(Map<String, DefaultFtpSessionFactory> ftpSessionFactories) {
		return new DelegatingSessionFactory<>(ftpSessionFactories::get);
	}

	@Bean
	DefaultFtpSessionFactory gary(@Value("${ftp2.username}") String username, @Value("${ftp2.password}") String pw, @Value("${ftp2.host}") String host, @Value("${ftp2.port}") int port) {
		return this.createSessionFactory(username, pw, host, port);
	}

	@Bean
	DefaultFtpSessionFactory josh(@Value("${ftp1.username}") String username, @Value("${ftp1.password}") String pw, @Value("${ftp1.host}") String host, @Value("${ftp1.port}") int port) {
		return this.createSessionFactory(username, pw, host, port);
    }

    @Bean
	FtpRemoteFileTemplate ftpRemoteFileTemplate(DelegatingSessionFactory<FTPFile> dsf) {
		var ftpRemoteFileTemplate = new FtpRemoteFileTemplate(dsf);
		ftpRemoteFileTemplate.setRemoteDirectoryExpression(new LiteralExpression(""));
		return ftpRemoteFileTemplate;
	}


	private DefaultFtpSessionFactory createSessionFactory(String username, String pw, String host, int port) {
		var defaultFtpSessionFactory = new DefaultFtpSessionFactory();
		defaultFtpSessionFactory.setPassword(pw);
		defaultFtpSessionFactory.setUsername(username);
		defaultFtpSessionFactory.setHost(host);
		defaultFtpSessionFactory.setPort(port);
		return defaultFtpSessionFactory;
    }

	@Bean
	RouterFunction<ServerResponse> routes() {
		var in = this.incoming();
		return route()
			.POST("/put/{sfn}", request -> {
				var name = request.pathVariable("sfn");
				var msg = MessageBuilder.withPayload(name).build();
				var sent = in.send(msg);
				return ServerResponse.ok().body(sent);
			})
			.build();
	}
}
您可以通过运行 curl -XPOST https://:8080/put/one 来亲自尝试这个流程。这将把文件上传到 bean 名称为 one 的 FTP 账户。尝试 curl -XPOST https://:8080/put/two 可以把文件上传到 bean 名称为 two 的 FTP 账户。
在本期的 Spring Tips 中,我们探讨了如何处理各种 FTP 集成场景。您可以使用这里学到的知识来使用框架中针对远程文件系统的其他支持。