
领先一步
VMware 提供培训和认证,助您加速进步。
了解更多作者:Jason Weathersby 和 Josh Long
开发人员使用 BIRT 在 Java/Java EE 环境中构建和部署报告。在 BIRT 3.7 中,提供了一个新的基于 POJO 的运行时环境,这使得 BIRT 引擎的部署更加简单。本文讨论了几个使用 Spring Framework 组件的 BIRT 集成场景。
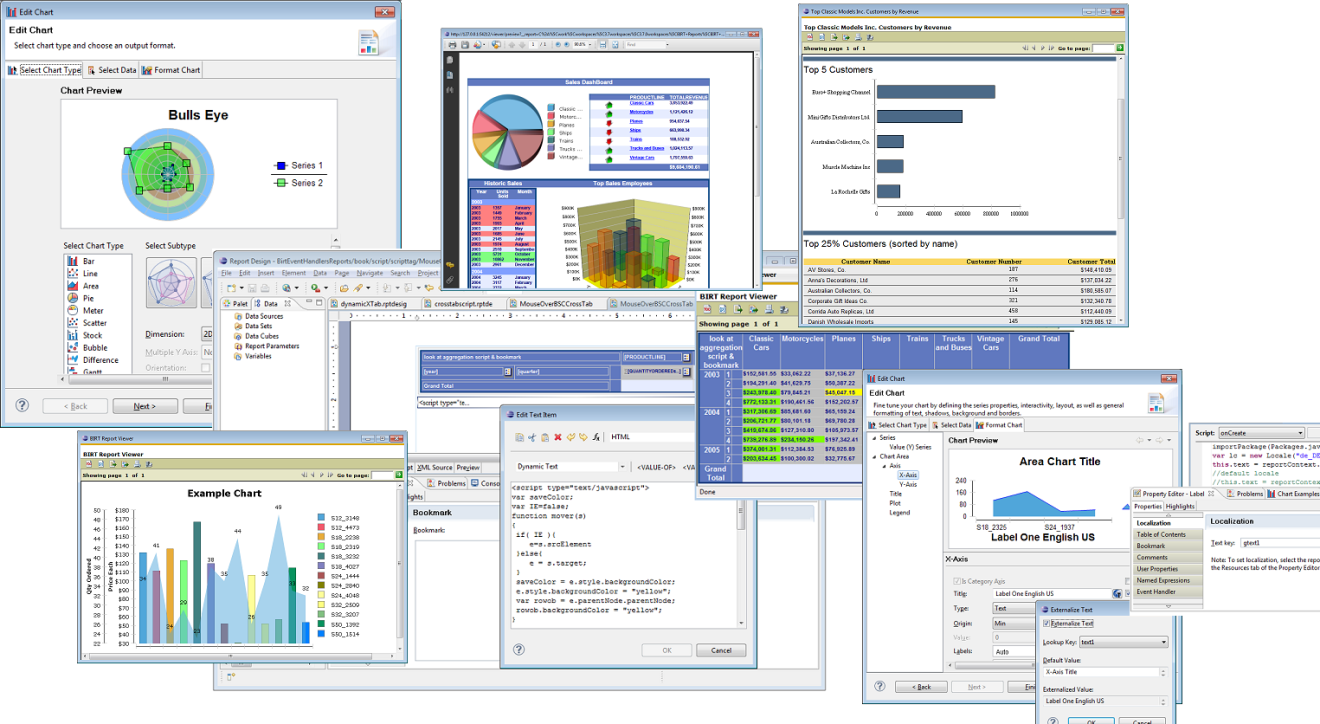 图 1 – BIRT 拼贴
BIRT 项目包含以下关键组件
Spring框架是一套流行的架构和实现方法,它使企业Java开发更加轻松。该框架的核心部分是依赖注入(Dependency Injection)和面向切面编程(Aspect Oriented Programming)。这些技术被用于减少应用程序中特定于基础设施的部分与作为其主要目标的业务功能之间的耦合。Spring框架以开源方式由VMware(最初的SpringSource公司于2009年被VMware收购)旗下的SpringSource业务部门开发。它在Java开发者社区中被广泛使用,并在所有平台上运行,包括VMware支持的Tomcat版本,称为tcServer。
虽然Spring框架提供了许多有用的功能,但大多数关于与BIRT集成的疑问都围绕着Spring MVC和报告中的Spring bean访问。本文涵盖了三种场景:
本文假定读者具备BIRT和Spring框架的编程知识。要了解更多关于Spring框架的信息,请查看“Green Beans”博客系列。
每种场景都附带一个示例,该示例是使用以下组件构建和测试的:
这些示例仅用于说明目的,包含非常少的错误检查。
在本文中,不同的集成场景都引用了一个通用的Spring bean,该bean为BIRT报告提供数据。Spring框架包含许多复杂的 JpaDataAccessComponent,但这个简单的示例是更复杂场景的有用的学习工具。在示例代码中,有两个包:org.eclipse.birt.spring.example 和 org.eclipse.birt.spring.core。示例包包含可以替换为您自己的数据访问对象的简单代码。核心包包含一个用于运行和渲染BIRT报告的Spring View,一个参数转换器类,用于将URL中输入的报告参数转换为相应的BIRT报告参数类型,以及一个BIRT引擎工厂,为其他bean提供Report Engine。示例类如下所示,并在本文中贯穿使用。核心类将在下一节中描述。
我们从一个简单的POJO开始,它将在我们的BIRT报告中使用。它被命名为Car,包含描述一辆车的简单属性。
package org.eclipse.birt.spring.example;

public class Car{
	private String make;
	private String model;
	private String year;
	public String getMake() {
		return make;
	}
	public void setMake(String make) {
		this.make = make;
	}
	public String getModel() {
		return model;
	}
	public void setModel(String model) {
		this.model = model;
	}
	public String getYear() {
		return year;
	}
	public void setYear(String year) {
		this.year = year;
	}
	public Car() {

	}
	public String toString(){
		return "Make:--"+this.make+" Model:--"+this.model+" Year:--"+this.year;
	}
	public String getCarString(){
		return( this.toString() );
	}
}
该示例提供了一个服务类,用于加载几个Car POJO用于报告目的。
package org.eclipse.birt.spring.example;
import java.util.*;

public class CarServiceImpl implements CarService {

	public List getAllCars (){
		Car car1 = new Car();
		car1.setYear("2000");
		car1.setMake("Chevrolet");
		car1.setModel("Corvette");
		Car car2 = new Car();
		car2.setYear("2005");
		car2.setMake("Dodge");
		car2.setModel("Viper");
		Car car3 = new Car();
		car3.setYear("2002");
		car3.setMake("Ford");
		car3.setModel("Mustang GT");
		List cars = Arrays.asList(  car1, car2, car3 ) ;
		return cars ;


	}
}
为了使此服务在Spring Context中可用,我们使用一个简单的类,该类通过Spring Annotations进行配置。
package org.eclipse.birt.spring.example;

import org.springframework.context.annotation.Bean;
import org.springframework.context.annotation.Configuration;


@Configuration
public class BirtDataServiceConfiguration {

	@Bean
	public CarService carService(){
		return new CarServiceImpl();

	}
}
有许多方法可以将BIRT引擎集成到Spring中,特别是Spring MVC。在本例中,我们实现了一个Spring View,它使用参数来确定用户想要的报告和输出格式。BIRT报告引擎被注入到View中,用于实际的报告运行和渲染。
BIRT引擎可以被多个线程使用,但启动它通常很昂贵。理想情况下,我们只希望为应用程序的生命周期启动一次BIRT引擎。我们还希望在应用程序关闭时正确关闭引擎。考虑到这一点,我们首先创建一个BirtEngineFactory类,它充当一个工厂bean,其他bean可以用来返回BIRT报告引擎的实例。在Spring中,FactoryBean接口是复杂对象的智能构造函数。它有一个重要的契约:从其getObject方法返回一个随时可用的对象。
package org.eclipse.birt.spring.core;
import java.io.File;
import java.io.IOException;
import org.eclipse.birt.core.exception.BirtException;
import org.eclipse.birt.core.framework.Platform;
import org.eclipse.birt.report.engine.api.EngineConfig;
import org.eclipse.birt.report.engine.api.IReportEngine;
import org.eclipse.birt.report.engine.api.IReportEngineFactory;
import org.springframework.beans.factory.DisposableBean;
import org.springframework.beans.factory.FactoryBean;
import org.springframework.context.ApplicationContext;
import org.springframework.context.ApplicationContextAware;
import org.springframework.core.io.Resource;
import org.springframework.util.Assert;
/**
Factory bean for the instance of the {@link IReportEngine report engine}.
*/
public class BirtEngineFactory implements FactoryBean, ApplicationContextAware, DisposableBean {
public boolean isSingleton(){ return true ; }
private ApplicationContext context ;
private IReportEngine birtEngine ;
private Resource logDirectory ;
private File _resolvedDirectory ;
private java.util.logging.Level logLevel ;
public void setApplicationContext(ApplicationContext ctx){
this.context = ctx;
}
public void destroy() throws Exception {
birtEngine.destroy();
Platform.shutdown() ;
}
public void setLogLevel( java.util.logging.Level ll){
this.logLevel = ll ;
}
public void setLogDirectory( org.springframework.core.io.Resource resource ){
File f=null;
try {
f = resource.getFile();
validateLogDirectory(f);
this._resolvedDirectory = f ;
} catch (IOException e) {
throw new RuntimeException( couldnt set the log directory);
}
}
private void validateLogDirectory (File f) {
Assert.notNull ( f , " the directory must not be null");
Assert.isTrue(f.isDirectory() , " the path given must be a directory");
Assert.isTrue(f.exists() , "the path specified must exist!");
}
public void setLogDirectory ( java.io.File f ){
validateLogDirectory(f) ;
this._resolvedDirectory = f;
}
public IReportEngine getObject(){
		EngineConfig config = new EngineConfig();

		//This line injects the Spring Context into the BIRT Context
		config.getAppContext().put("spring", this.context );
config.setLogConfig( null != this._resolvedDirectory ? this._resolvedDirectory.getAbsolutePath() : null , this.logLevel);
try {
Platform.startup( config );
}
catch ( BirtException e ) {
throw new RuntimeException ( "Could not start the Birt engine!", e) ;
}
IReportEngineFactory factory = (IReportEngineFactory) Platform.createFactoryObject( IReportEngineFactory.EXTENSION_REPORT_ENGINE_FACTORY );
IReportEngine be = factory.createReportEngine( config );
this.birtEngine = be ;
return be ;
}
@Override
public Class getObjectType() {
return IReportEngine.class;
}
}
该类还实现了DisposableBean接口,以便在应用程序关闭时能够正确关闭引擎。当Spring ApplicationContext关闭时,Spring将调用实现了DisposableBean的所有bean的DisposableBean#destroy方法。我们的实现调用了destroy方法。最后,该类实现了ApplicationContextAware接口,以接收SpringApplicationContext的实例。我们存储ApplicationContext,然后使用以下代码将其传递给BIRT Report Engine:
EngineConfig config = new EngineConfig();
//This line injects the Spring Context into the BIRT Context
config.getAppContext().put("spring", this.context );
此代码允许从BIRT Scripting和Expressions中访问Spring Context对象。
接下来,我们创建一个运行和渲染报告的Spring View。这个View期望BIRT报告引擎被注入。View在请求中搜索ReportName和ReportFormat参数,以决定运行哪个报告以及需要什么格式。请求中还会搜索报告参数名称。如果找到,这些报告参数将被设置为相应的值。此View的一部分内容如下所示。有关更多信息,请参阅示例代码。
/**
* BirtView is used to run and render BIRT reports.
* This class expects the request to contain a ReportName and ReportFormat
* parameter. In addition Report parameters are automatically searched for in the
* the request object.
*/
public class BirtView extends AbstractView {
public static final String PARAM_ISNULL = "__isnull";
public static final String UTF_8_ENCODE = "UTF-8";
private IReportEngine birtEngine;
private String reportNameRequestParameter = ReportName ;
private String reportFormatRequestParameter = ReportFormat ;
private IRenderOption renderOptions ;
public void setRenderOptions(IRenderOption ro) {
this.renderOptions = ro;
}
public void setReportFormatRequestParameter( String rf ){
Assert.hasText( rf , the report format parameter must not be null) ;
this.reportFormatRequestParameter = rf ;
}
public void setReportNameRequestParameter ( String rn ) {
Assert.hasText( rn , the reportNameRequestParameter must not be null) ;
this.reportNameRequestParameter = rn ;
}
protected void renderMergedOutputModel(
Map map, HttpServletRequest request,
HttpServletResponse response) throws Exception {
String reportName = request.getParameter( this.reportNameRequestParameter );
String format = request.getParameter( this.reportFormatRequestParameter );
ServletContext sc = request.getSession().getServletContext();
if( format == null ){
format="html";
}
IReportRunnable runnable = null;
runnable = birtEngine.openReportDesign( sc.getRealPath("/Reports")+"/"+reportName );
IRunAndRenderTask runAndRenderTask = birtEngine.createRunAndRenderTask(runnable);
runAndRenderTask.setParameterValues(discoverAndSetParameters( runnable, request ));
response.setContentType( birtEngine.getMIMEType( format ));
IRenderOption options = null == this.renderOptions ? new RenderOption() : this.renderOptions;
if( format.equalsIgnoreCase("html")){
HTMLRenderOption htmlOptions = new HTMLRenderOption( options);
htmlOptions.setOutputFormat("html");
htmlOptions.setOutputStream(response.getOutputStream());
htmlOptions.setImageHandler(new HTMLServerImageHandler());
htmlOptions.setBaseImageURL(request.getContextPath()+"/images");
htmlOptions.setImageDirectory(sc.getRealPath("/images"));
runAndRenderTask.setRenderOption(htmlOptions);
}else if( format.equalsIgnoreCase("pdf") ){
PDFRenderOption pdfOptions = new PDFRenderOption( options );
pdfOptions.setOutputFormat("pdf");
pdfOptions.setOption(IPDFRenderOption.PAGE_OVERFLOW, IPDFRenderOption.FIT_TO_PAGE_SIZE);
pdfOptions.setOutputStream(response.getOutputStream());
runAndRenderTask.setRenderOption(pdfOptions);
}else{
String att ="download."+format;
String uReportName = reportName.toUpperCase();
if( uReportName.endsWith(".RPTDESIGN") ){
att = uReportName.replace(".RPTDESIGN", "."+format);
}
response.setHeader( "Content-Disposition", "attachment; filename=\"" + att + "\"" );
options.setOutputStream(response.getOutputStream());
options.setOutputFormat(format);
runAndRenderTask.setRenderOption(options);
}
runAndRenderTask.getAppContext().put( EngineConstants.APPCONTEXT_BIRT_VIEWER_HTTPSERVET_REQUEST, request );
runAndRenderTask.run();
runAndRenderTask.close();
}
public void setBirtEngine(IReportEngine birtEngine) {
this.birtEngine = birtEngine;
}
.
.
要设置Spring MVC(并在我们的应用程序中使用这个新的View),我们需要创建一个带有@EnableWebMVC注解的Spring @Configuration类。要覆盖Spring MVC机制的某些部分,我们可以简单地扩展基类-WebMvcConfigurerAdapter-并接入适当的回调方法。这是一个常规的Spring @Configuration类,就像我们之前配置服务时看到的那样。我们使用@ComponentScan注解告诉Spring将我们两个包中的注解bean注册到Spring context。接下来,我们重写addViewControllers方法,告诉Spring以“/reports”结尾的URL应该被委托给新的Birt Spring MVCView。birtView和BIRT引擎被创建为bean,并且BirtView bean的birtEngine属性被设置。
package org.eclipse.birt.spring.example;

import org.eclipse.birt.spring.core.BirtEngineFactory;
import org.eclipse.birt.spring.core.BirtView;
import org.springframework.context.annotation.Bean;
import org.springframework.context.annotation.ComponentScan;
import org.springframework.context.annotation.Configuration;
import org.springframework.context.annotation.Import;
import org.springframework.web.servlet.config.annotation.EnableWebMvc;
import org.springframework.web.servlet.config.annotation.ViewControllerRegistry;
import org.springframework.web.servlet.config.annotation.WebMvcConfigurerAdapter;
import org.springframework.web.servlet.view.BeanNameViewResolver;

@EnableWebMvc
@ComponentScan( {"org.eclipse.birt.spring.core", "org.eclipse.birt.spring.example"})
@Configuration
public class BirtWebConfiguration  extends WebMvcConfigurerAdapter  {

	@Override
	public void addViewControllers(ViewControllerRegistry registry) {
		registry.addViewController("/reports").setViewName("birtView");

	}

	@Bean
	public BirtView birtView(){
		BirtView bv = new BirtView();
		bv.setBirtEngine( this.engine().getObject() );
		return bv;
	}


	@Bean public BeanNameViewResolver beanNameResolver(){
		BeanNameViewResolver br = new BeanNameViewResolver() ;
		return br;
	}

	@Bean
	protected BirtEngineFactory engine(){
		BirtEngineFactory factory = new BirtEngineFactory() ;
		//Enable BIRT Engine Logging
		//factory.setLogLevel( Level.FINEST);
		//factory.setLogDirectory( new FileSystemResource("c:/temp"));

		return factory ;
	}


}
如前所述,在描述BIRT引擎工厂类时,我们将SpringApplicationContext的引用提供给BIRT上下文。BIRT上下文对象只不过是BIRT引擎提供给下游进程(如BIRT表达式、BIRT事件处理程序等)的对象Map。BIRT使用Rhino JavaScript引擎来处理BIRT表达式和评估JavaScript事件处理程序。BIRT上下文预先加载到Rhino引擎对象的脚本环境中。这个对象允许报告开发者检索一个Spring bean,并使用以下语法在表达式或事件脚本中使用它:
var mypojo = spring.getBean("carService");
mypojo.getAllCars() ().get(0);
如果您不想将Spring context注入到BIRT应用程序上下文中,您始终可以使用类似以下代码的JavaScript来访问BIRT表达式和JavaScript事件处理程序中的Spring bean:
importPackage(Packages.org.springframework.context);
importPackage(Packages.org.springframework.web.context.support );
//ServletContext
var sc = reportContext.getHttpServletRequest().getSession().getServletContext();
//ApplicationContext
var spring = WebApplicationContextUtils.getWebApplicationContext(sc);
var mypojo = spring.getBean("carService");
this.text = mypojo.getAllCars().get(0).getMake();
要运行此Web应用程序,请将下载的BIRT 3.7.1运行时birt-runtime-3_7_1\ReportEngine\lib目录中的JAR文件添加到webapp的WEB-INF/lib目录中。您还需要从Spring Framework下载以下JAR文件到WEB-INF/lib:
本文附带的示例具有以下web.xml:
<?xml version="1.0" encoding="utf-8"?>
<!DOCTYPE web-app PUBLIC "-//Sun Microsystems, Inc.//DTD Web Application 2.2//EN"
    "http://java.sun.com/j2ee/dtds/web-app_2_2.dtd">
<web-app>

 <servlet>
   <servlet-name>springandbirt</servlet-name>
   <servlet-class>
     org.springframework.web.servlet.DispatcherServlet
   </servlet-class>
   <init-param>
     <param-name>contextClass</param-name>
     <param-value>org.springframework.web.context.support.AnnotationConfigWebApplicationContext</param-value>
   </init-param>
   <init-param>
     <param-name>contextConfigLocation</param-name>
     <param-value>org.eclipse.birt.spring.example.BirtWebConfiguration</param-value>
   </init-param>
   <load-on-startup>1</load-on-startup>
 </servlet>

 <servlet-mapping>
   <servlet-name>springandbirt</servlet-name>
   <url-pattern>/reports</url-pattern>
 </servlet-mapping>

  <welcome-file-list>
    <welcome-file>
      index.jsp
    </welcome-file>
  </welcome-file-list>
</web-app>
所有 /reports URL 都被路由到 Spring DispatcherServlet。index.jsp有两个链接来运行两个报告示例。一个报告使用BIRT Sample Derby数据库,另一个访问Car Service bean,如下面的代码所示:
<html>
<head>
</head>
<body>
<h1>BIRT Report</h1>
<p>
<a href="https://:8080/springandbirt/reports?ReportName=TopNPercent.rptdesign">click here to run BIRT Report</a><br>
<a href="https://:8080/springandbirt/reports?ReportName=SampleSpring.rptdesign">click here to run BIRT Report that calls a Spring Bean</a>
</p>
<%= new java.util.Date() %>
</body>
</html>
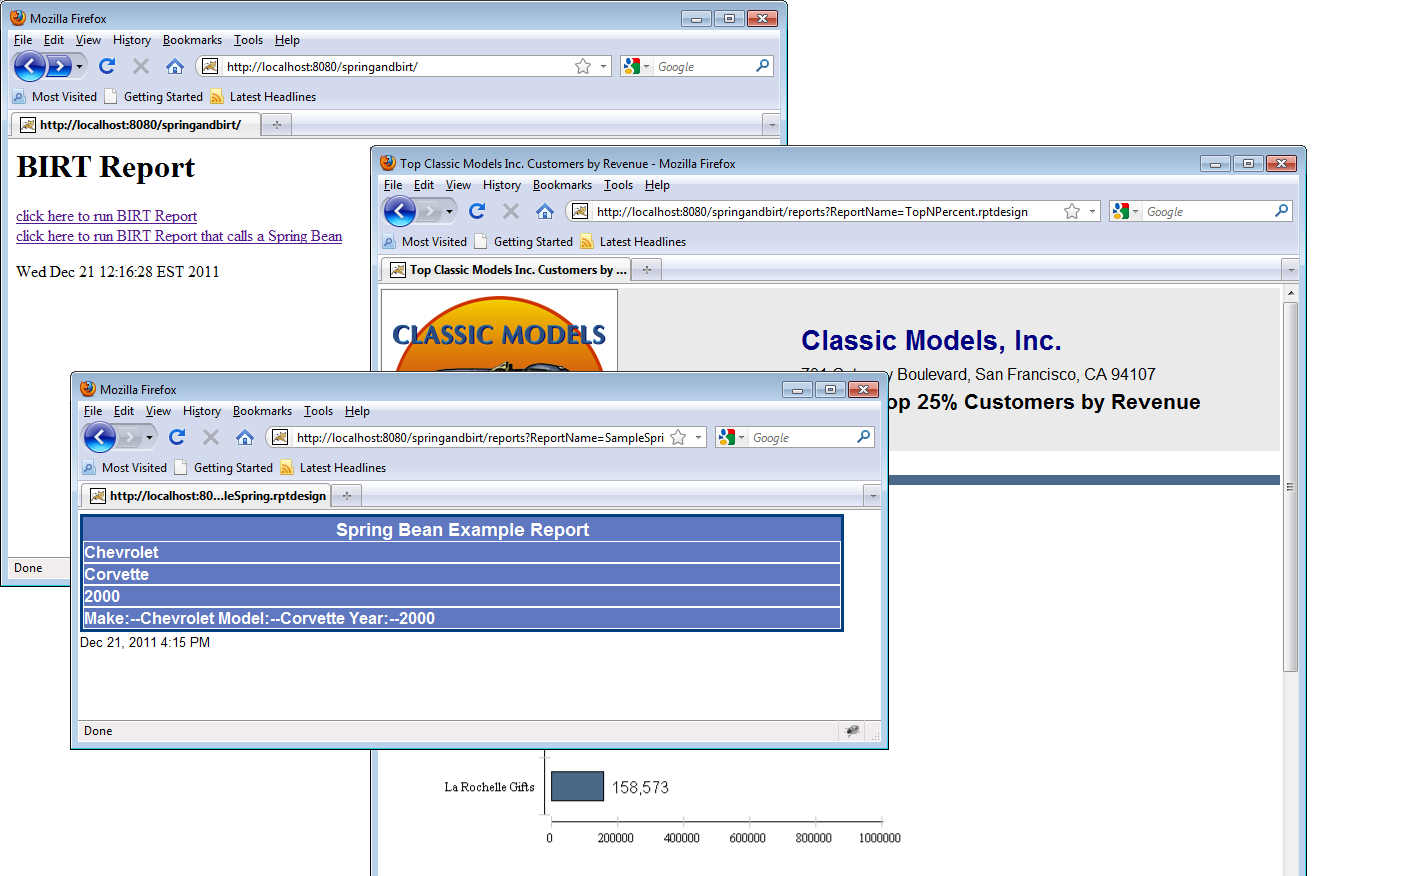 图 1 – 查看 BIRT Spring MVC 示例输出
在许多情况下,BIRT用户希望将Spring IOC容器添加到BIRT Viewer中。Viewer是一个基于AJAX的Java Web应用程序,用于运行和渲染报告。Viewer支持分页、目录和导出到其他格式(如PDF)。以这种方式部署时,开发人员需要访问Spring容器中的bean以进行报告目的。此场景实现起来非常简单。
从BIRT网站下载并解压BIRT Runtime。BIRT Viewer位于运行时下载的WebViewerExample目录中。要将Viewer部署到Tomcat,用户只需将WebViewerExample目录复制到tomcatinstall/webapps目录中。大多数用户会将此文件夹重命名为更贴切的名称,如BirtViewer。BIRT网站提供了更多关于将Viewer部署到其他应用程序服务器的详细信息。Viewer安装后,可以在Viewer的web.xml中添加一个Spring ContextLoaderListener。为此,在web.xml的context参数下方添加以下监听器条目:
<listener>
	<listener-class>org.springframework.web.context.ContextLoaderListener</listener-class>
</listener>
您还可以指定一个context参数指向Spring Context类,如下面的代码所示:
   <context-param>
     <param-name>contextClass</param-name>
     <param-value>org.springframework.web.context.support.AnnotationConfigWebApplicationContext</param-value>
   </context-param>
   <context-param>
     <param-name>contextConfigLocation</param-name>
     <param-value>org.eclipse.birt.spring.webviewer.example.BirtDataServiceConfiguration</param-value>
   </context-param>
在此场景中,我们不需要BirtWebConfiguration类,因此我们将contextConfigLocation指向BirtDataServiceConfiguration类。
这里使用了本文第一部分描述的相同的POJO类(只是包名不同),并且需要放在Viewer的WEB-INF/classes目录中,或者将包放在JAR文件中并放入Viewer的WEB-INF/lib目录中。最后,将以下Spring Framework下载中的JAR文件添加到Viewer的WEB-INF/lib目录中:
要访问BIRT表达式中的carService bean或从BIRT JavaScript事件处理程序中访问,请使用以下语法:
//BIRT label report item onCreate Script
importPackage(Packages.org.springframework.context);
importPackage(Packages.org.springframework.web.context.support );
var sc = reportContext.getHttpServletRequest().getSession().getServletContext();
//ApplicationContext
spring = WebApplicationContextUtils.getWebApplicationContext(sc);
var mypojo = spring.getBean("carService");
this.Text = mypojo.getAllCars().get(0).getMake();
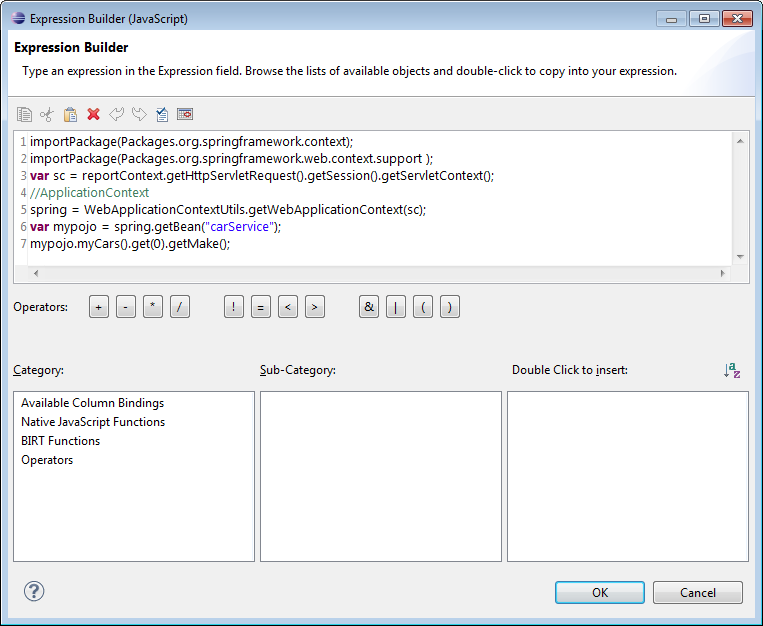 图 2 – 构建 BIRT 表达式
在Designer中预览报告时,BIRT表达式或脚本会失败。为了防止失败,请将表达式或脚本包装在“if”语句中,如下面的代码所示:
if( !reportContext.getHttpServletRequest().getAttribute("attributeBean").isDesigner()){
//Access Bean
}
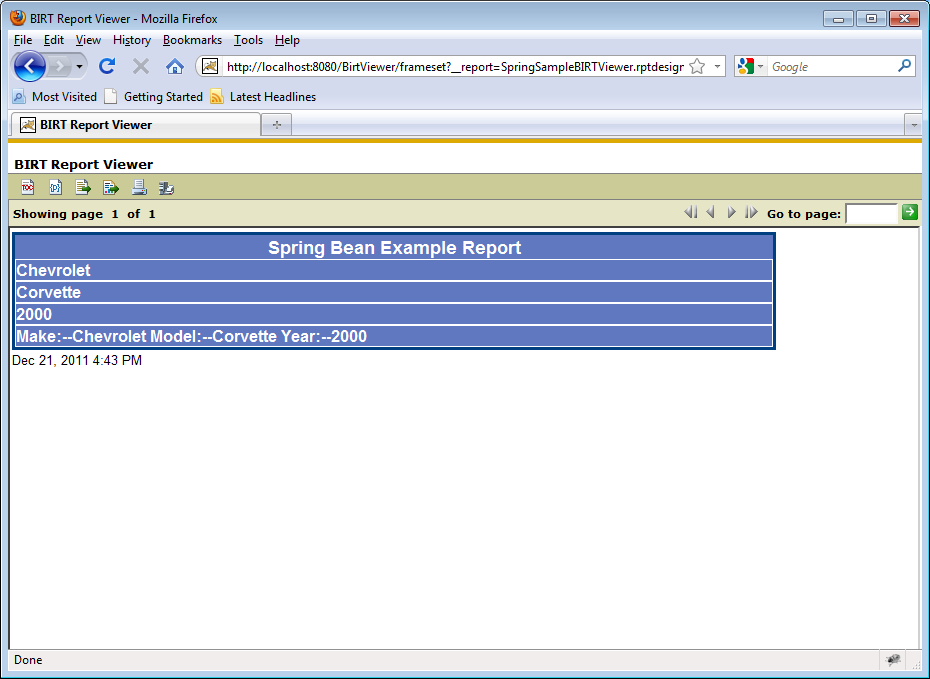 图 3 – 在 BIRT Viewer 中显示 Spring bean 输出
本文的前两部分重点介绍了将BIRT引擎和Viewer与Spring框架集成。虽然这些方法效果很好,但假设您需要访问位于单独的上下文或另一台机器上的Spring bean。Spring Remoting可用于实现此功能。
虽然任何Spring Remoting技术或其他机制(如SOAP或REST)都可以工作,但本节将描述使用Spring的基于HTTP Invoker的服务导出器。为了实现这个例子,我们首先构建一个示例Web应用程序,其中包含一个Car Service bean,它为remoting客户端提供Car POJO。
对于remoting,我们首先定义Car POJO,如下面的代码所示:
package org.eclipse.birt.spring.remoting.example;

public class Car implements ICar{

	private static final long serialVersionUID = 1L;
	private String make;
	private String model;
	private String year;
	public String getMake() {
		return make;
	}
	public void setMake(String make) {
		this.make = make;
	}
	public String getModel() {
		return model;
	}
	public void setModel(String model) {
		this.model = model;
	}
	public String getYear() {
		return year;
	}
	public void setYear(String year) {
		this.year = year;
	}
	public Car() {
		this.year = "2000";
		this.make = "Chevrolet";
		this.model = "Corvette";
	}
	public String toString(){
		return "Make:--"+this.make+" Model:--"+this.model+" Year:--"+this.year;
	}
}
接下来,我们实现Car Service。
package org.eclipse.birt.spring.remoting.example;
import java.util.Arrays;
import java.util.List;

import org.eclipse.birt.spring.remoting.example.Car;
import org.eclipse.birt.spring.remoting.example.CarService;
public class CarServiceImpl implements CarService{

public List getAllCars(){
	Car car1 = new Car();
	car1.setYear("2000");
	car1.setMake("Chevrolet");
	car1.setModel("Corvette");
	Car car2 = new Car();
	car2.setYear("2005");
	car2.setMake("Dodge");
	car2.setModel("Viper");
	Car car3 = new Car();
	car3.setYear("2002");
	car3.setMake("Ford");
	car3.setModel("Mustang GT");
	List cars = Arrays.asList(  car1, car2, car3 ) ;
	return cars ;


}
}
最后,我们实现BirtDataServiceConfiguration文件来处理Spring上下文的Java配置。
package org.eclipse.birt.spring.remoting.example;

import java.util.HashMap;
import java.util.Map;

import org.springframework.context.annotation.Bean;
import org.springframework.context.annotation.Configuration;
import org.springframework.remoting.httpinvoker.HttpInvokerServiceExporter;
import org.springframework.web.servlet.handler.SimpleUrlHandlerMapping;


@Configuration
public class BirtDataServiceConfiguration {

	@Bean
	public CarService carService(){

		return  new CarServiceImpl();
	}

	@Bean
	public HttpInvokerServiceExporter myServiceExporter(){
		HttpInvokerServiceExporter hse = new HttpInvokerServiceExporter();
		hse.setService( this.carService()) ;
		hse.setServiceInterface( CarService.class);
		return hse;
	}

	@Bean
	public SimpleUrlHandlerMapping myUrlMapping(){

		SimpleUrlHandlerMapping mapping = new SimpleUrlHandlerMapping();
		Map urlMap = new HashMap();
		urlMap.put("/carService", myServiceExporter());
		mapping.setUrlMap(urlMap);
		mapping.setAlwaysUseFullPath(true);
		return mapping;
	}


}
这个类只是将 /carService URL映射到一个HttpInvokerServiceExporter对象,该对象向remoting客户端公开carService bean。
接下来,我们可以为这个应用程序创建一个web.xml,它使用Spring DispatcherServlet,如下面的代码所示:
<?xml version="1.0" encoding="utf-8"?>
<!DOCTYPE web-app PUBLIC "-//Sun Microsystems, Inc.//DTD Web Application 2.2//EN"
    "http://java.sun.com/j2ee/dtds/web-app_2_2.dtd">
<web-app>

 <servletgt;
   <servlet-name>springandbirt</servlet-name>
   <servlet-class>
     org.springframework.web.servlet.DispatcherServlet
   </servlet-class>
   <init-param>
     <param-namegt;contextClass</param-name>
     <param-valuegt;org.springframework.web.context.support.AnnotationConfigWebApplicationContextlt;/param-value>
   </init-param>
   <init-param>
     <param-name>contextConfigLocation</param-name>
     <param-value>org.eclipse.birt.spring.remoting.example.BirtDataServiceConfiguration</param-value>
   </init-param>
   <load-on-startup>1</load-on-startup>
 </servlet>

 <servlet-mapping>
   <servlet-name>springandbirt</servlet-name>
   <url-pattern>/carService</url-pattern>
 </servlet-mapping>

  <welcome-file-list>
    <welcome-file>
      index.jsp
    </welcome-file>
  </welcome-file-list>

</web-app>
Web应用程序需要在WEB-INF/lib目录中包含Spring Framework的以下JAR文件:
现在可以构建和部署该应用程序了。
接下来,我们需要构建一个remoting客户端来访问前面构建的应用程序。在本例中,它只是一个JAR文件,我们可以将其包含在BIRT Viewer中,以便在单独的上下文中访问carService。
客户端jar应该包含CarService接口和CarPojo/ICarPojo类/接口。除了这三个类之外,我们还需要一个配置类来处理Spring Context的Java配置:
这个类使用AnnotationConfigApplicationContext类来指定一个Java类来处理Spring Context的配置。ContextConfig类如下所示,它使用HttpInvokerProxyFactoryBean连接到服务器并检索car service bean。
package org.eclipse.birt.spring.remoting.client.example;

import org.eclipse.birt.spring.remoting.example.CarService;
import org.springframework.context.annotation.Bean;
import org.springframework.context.annotation.Configuration;
import org.springframework.remoting.httpinvoker.HttpInvokerProxyFactoryBean;

@Configuration
public class ContextConfig {

	@Bean
	public HttpInvokerProxyFactoryBean client() {
		HttpInvokerProxyFactoryBean proxy = new HttpInvokerProxyFactoryBean();
		proxy.setServiceInterface(CarService.class);
		proxy.setServiceUrl("https://:8080/springandbirtremote/carService");
		return proxy;
	}

}
这个配置文件定义了一个充当HTTP invoker代理的bean。service URL定义了我们之前定义的remoting服务器的位置,service interface定义了返回的对象。要构建客户端JAR文件,请将与服务器相同的JAR文件添加到类路径中。
要从BIRT viewer调用car service,请在BIRT Expression Builder或JavaScript事件处理程序中使用以下JavaScript片段,如下面的代码所示:
importPackage(Packages.org.springframework.context);
importPackage(Packages.org.springframework.web.context.support );
var sc = reportContext.getHttpServletRequest().getSession().getServletContext();
//ApplicationContext
var spring = WebApplicationContextUtils.getWebApplicationContext(sc);
var mypojo = spring.getBean("client");
mypojo.getAllCars().get(0).getMake();
将关于构建remoting服务器一节中描述的所有jar文件添加到BIRT Viewer的WEB-INF/lib中。此外,将remoting客户端jar添加到BIRT Viewer的WEB-INF/lib中。最后,将以下内容添加到已部署viewer的web.xml中。这些设置已在本文章的“从BIRT Viewer访问Spring Bean”一节中讨论过。请注意,contextConfigLocation已更改为ContextConfig类。
<listener>
	<listener-class>org.springframework.web.context.ContextLoaderListener</listener-class>
</listener>

   <context-param>
     <param-name>contextClass</param-name>
     <param-value>org.springframework.web.context.support.AnnotationConfigWebApplicationContext</param-value>
   </context-param>
   <context-param>
     <param-name>contextConfigLocation</param-name>
     <param-value>org.eclipse.birt.spring.webviewer.example.ContextConfig</param-value>
   </context-param>
这种方法允许现有的已部署BIRT Viewer访问单独的机器/上下文来访问远程bean。最后说明一下,如果您使用中间Java类来访问远程Bean,请使用以下代码:
.
.
private final CarService carPojoService;

	public CarPojoClient(){
		final ApplicationContext context = new AnnotationConfigApplicationContext( ContextConfig.class);
		this.carPojoService = (CarService) context.getBean("client");
.
.
Spring和BIRT框架在Java社区中非常受欢迎。许多BIRT技术的用户也将其Spring功能作为企业应用程序代码的一部分,用于处理数据源、报告呈现和访问控制等功能。这些只是在BIRT结合使用Spring框架的众多好处中的一部分。本文提供了将BIRT和Spring集成的入门介绍。虽然还存在其他场景,但本文可以作为学习工具,帮助您开始同时使用这两种技术。
希望利用本文所述集成类的开发人员可以使用下面下载的SpringandBirtCoreJar.zip。对于示例,请参阅SpringBirtArticleSamples.zip下载。