抢占先机
VMware 提供培训和认证,助您快速进步。
了解更多在之前的一篇文章中,我写了关于我们在 Spring @MVC 3.0 版本中添加的 REST 功能。后来,Alef 写了一篇文章,介绍了如何使用这些功能为 Pet Clinic 应用程序添加 Atom 视图。在这篇文章中,我想介绍一下我们在 Milestone 2 中添加的客户端功能。
该模板的主要入口点以六个主要的 HTTP 方法命名
这些方法的名称清楚地表明它们调用了哪个 HTTP 方法,而名称的第二部分则表明了返回值。例如,getForObject()将执行 GET 请求,将 HTTP 响应转换为您选择的对象类型,并返回该对象。postForLocation将执行 POST 请求,将给定对象转换为 HTTP 请求,并返回响应中的 HTTP Location 头,其中可以找到新创建的对象。如您所见,这些方法试图强制遵循 REST 最佳实践。
这些方法都将 URI 作为第一个参数。该 URI 可以是一个 URI 模板,并且可以使用变量将模板扩展为普通 URI。模板变量可以通过两种形式传递:作为 String 变量参数数组,或作为 Map<String, String>。String varargs 变体按顺序扩展给定的模板变量,因此
String result = restTemplate.getForObject("http://example.com/hotels/{hotel}/bookings/{booking}", String.class, "42", "21");
将对以下 URI 执行 GET 请求:http://example.com/hotels/42/bookings/21。Map 变体根据变量名扩展模板,因此在使用许多变量或单个变量被多次使用时更有用。例如
Map<String, String> vars = new HashMap<String, String>();
vars.put("hotel", "42");
vars.put("booking", "21");
String result = restTemplate.getForObject("http://example.com/hotels/{hotel}/bookings/{booking}", String.class, vars);
也将对以下 URI 执行 GET 请求:http://example.com/hotels/42/rooms/42.
<photos page="2" pages="89" perpage="10" total="881">
	<photo id="2636" owner="47058503995@N01"
		secret="a123456" server="2" title="test_04"
		ispublic="1" isfriend="0" isfamily="0" />
	<photo id="2635" owner="47058503995@N01"
		secret="b123456" server="2" title="test_03"
		ispublic="0" isfriend="1" isfamily="1" />
	<photo id="2633" owner="47058503995@N01"
		secret="c123456" server="2" title="test_01"
		ispublic="1" isfriend="0" isfamily="0" />
	<photo id="2610" owner="12037949754@N01"
		secret="d123456" server="2" title="00_tall"
		ispublic="1" isfriend="0" isfamily="0" />
</photos>
使用 RestTemplate,获取这样的文档非常简单:
final String photoSearchUrl =
   "http://www.flickr.com/services/rest?method=flickr.photos.search&api+key={api-key}&tags={tag}&per_page=10";
Source photos = restTemplate.getForObject(photoSearchUrl, Source.class, apiKey, searchTerm);
其中apiKey和searchTerm是命令行上给定的两个字符串。此方法使用SourceHttpMessageConverter将 HTTP XML 响应转换为javax.xml.transform.Source(请注意,SourceHttpMessageConverter 是我们在发布 Spring 3.0 M2 后不久引入的,因此您需要获取最新的快照版本(或即将发布的 M3)才能使用它。下面提供的示例项目已配置为通过 Maven 获取这些依赖项)。
List<BufferedImage> imageList = xpathTemplate.evaluate("//photo", photos, new NodeMapper() {
    public Object mapNode(Node node, int i) throws DOMException {
        Element photo = (Element) node;

        Map<String, String> variables = new HashMap<String, String>(3);
        variables.put("server", photo.getAttribute("server"));
        variables.put("id", photo.getAttribute("id"));
        variables.put("secret", photo.getAttribute("secret"));

        String photoUrl = "http://static.flickr.com/{server}/{id}_{secret}_m.jpg";
        return restTemplate.getForObject(photoUrl, BufferedImage.class, variables);
    }
});
例如,给定上面提供的 XML 文档,imageList将包含 4 张图片。获取的第一张图片的 URL 将是http://static.flickr.com/2/2636_ a123456_m.jpg,第二张是http://static.flickr.com/2/2635_ b123456_m.jpg,等等。
public class BufferedImageHttpMessageConverter implements HttpMessageConverter<BufferedImage> {

    public List<MediaType> getSupportedMediaTypes() {
        return Collections.singletonList(new MediaType("image", "jpeg"));
    }

    public boolean supports(Class<? extends BufferedImage> clazz) {
        return BufferedImage.class.equals(clazz);
    }

    public BufferedImage read(Class<BufferedImage> clazz, HttpInputMessage inputMessage) throws IOException {
        return ImageIO.read(inputMessage.getBody());
    }

    public void write(BufferedImage image, HttpOutputMessage message) throws IOException {
        throw new UnsupportedOperationException("Not implemented");
    }

}
请注意,我们没有实现write()因为我们不是上传图片,只是下载它们。现在我们只需将这个转换器插入 RestTemplate。我们在 Spring 应用程序上下文中这样做:
<beans xmlns="http://www.springframework.org/schema/beans"
       xmlns:xsi="http://www.w3.org/2001/XMLSchema-instance"
       xsi:schemaLocation="http://www.springframework.org/schema/beans http://www.springframework.org/schema/beans/spring-beans.xsd">

    <bean id="flickrClient" class="com.springsource.samples.resttemplate.FlickrClient">
        <constructor-arg ref="restTemplate"/>
        <constructor-arg ref="xpathTemplate"/>
    </bean>

    <bean id="restTemplate" class="org.springframework.web.client.RestTemplate">
        <property name="messageConverters">
            <list>
                <bean class="org.springframework.http.converter.xml.SourceHttpMessageConverter"/>
                <bean class="com.springsource.samples.resttemplate.BufferedImageHttpMessageConverter"/>
            </list>
        </property>
    </bean>

    <bean id="xpathTemplate" class="org.springframework.xml.xpath.Jaxp13XPathTemplate"/>

</beans>
JFrame frame = new JFrame(searchTerm + " photos");
frame.setLayout(new GridLayout(2, imageList.size() / 2));
for (BufferedImage image : imageList) {
    frame.add(new JLabel(new ImageIcon(image)));
}
frame.setDefaultCloseOperation(JFrame.EXIT_ON_CLOSE);
frame.pack();
frame.setVisible(true);
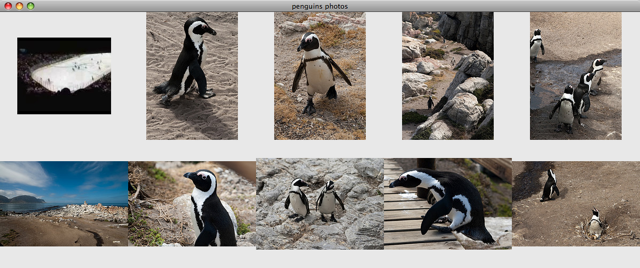
结果如下:

总的来说,我希望这篇文章向您展示了使用 RestTemplate 与 HTTP 服务器交互是多么简单。只需不到 30 行 Java 代码,我们就创建了一个 GUI,可以显示每个人最喜欢的鸟类的照片:企鹅!查看 RestTemplate 并告诉我们您的想法!