<!DOCTYPE html>
<html xmlns="http://www.w3.org/1999/xhtml" xmlns:th="https://www.thymeleaf.org">
    <head>
        <title>Spring Security Example</title>
    </head>
    <body>
        <h1>Welcome!</h1>

        <p>Click <a th:href="@{/hello}">here</a> to see a greeting.</p>
    </body>
</html>保护 Web 应用程序
本指南将引导您完成创建一个简单 Web 应用程序的过程,该应用程序的资源受 Spring Security 保护。
您将构建什么
您将构建一个 Spring MVC 应用程序,该应用程序通过一个由固定用户列表支持的登录表单来保护页面。
您需要准备什么
-
大约 15 分钟
-
趁手的文本编辑器或 IDE
-
Java 17 或更高版本
-
您也可以直接将代码导入到您的 IDE 中
如何完成本指南
与大多数 Spring 入门指南一样,您可以从头开始完成每个步骤,也可以跳过已经熟悉的基本设置步骤。无论哪种方式,您最终都会得到可以运行的代码。
要从头开始,请转到使用 Spring Initializr 开始。
要跳过基础部分,请执行以下操作
-
下载并解压本指南的源代码仓库,或使用 Git 克隆:
git clone https://github.com/spring-guides/gs-securing-web.git -
进入目录
gs-securing-web/initial
完成时,您可以对照 gs-securing-web/complete 中的代码检查结果。
使用 Spring Initializr 开始
您可以使用这个预初始化项目并点击 Generate 下载一个 ZIP 文件。该项目已配置好,适用于本教程中的示例。
手动初始化项目
-
导航到https://start.spring.io。此服务将引入您应用程序所需的所有依赖项,并为您完成大部分设置。
-
选择 Gradle 或 Maven 以及您想使用的语言。本指南假设您选择了 Java。
-
点击 Dependencies,然后选择 Spring Web 和 Thymeleaf。
-
点击 Generate。
-
下载生成的 ZIP 文件,它是一个根据您的选择配置好的 Web 应用程序归档文件。
| 如果您的 IDE 集成了 Spring Initializr,您可以直接在 IDE 中完成此过程。 |
| 您也可以从 Github Fork 项目并在您的 IDE 或其他编辑器中打开。 |
创建未受保护的 Web 应用程序
在将安全性应用于 Web 应用程序之前,您需要一个需要保护的 Web 应用程序。本节将引导您创建一个简单的 Web 应用程序。然后,您将在下一节中使用 Spring Security 对其进行保护。
该 Web 应用程序包含两个简单的视图:主页和“Hello, World”页面。主页在以下 Thymeleaf 模板中定义(来自 src/main/resources/templates/home.html)
这个简单的视图包含一个指向 /hello 页面的链接,该页面在以下 Thymeleaf 模板中定义(来自 src/main/resources/templates/hello.html)
<!DOCTYPE html>
<html xmlns="http://www.w3.org/1999/xhtml" xmlns:th="https://www.thymeleaf.org">
    <head>
        <title>Hello World!</title>
    </head>
    <body>
        <h1>Hello world!</h1>
    </body>
</html>
该 Web 应用程序基于 Spring MVC。因此,您需要配置 Spring MVC 并设置视图控制器来暴露这些模板。以下列表(来自 src/main/java/com/example/securingweb/MvcConfig.java)展示了一个在应用程序中配置 Spring MVC 的类
package com.example.securingweb;

import org.springframework.context.annotation.Configuration;
import org.springframework.web.servlet.config.annotation.ViewControllerRegistry;
import org.springframework.web.servlet.config.annotation.WebMvcConfigurer;

@Configuration
public class MvcConfig implements WebMvcConfigurer {

	public void addViewControllers(ViewControllerRegistry registry) {
		registry.addViewController("/home").setViewName("home");
		registry.addViewController("/").setViewName("home");
		registry.addViewController("/hello").setViewName("hello");
		registry.addViewController("/login").setViewName("login");
	}

}
addViewControllers() 方法(它覆盖了 WebMvcConfigurer 中同名的方法)添加了四个视图控制器。其中两个视图控制器引用名为 home 的视图(在 home.html 中定义),另一个引用名为 hello 的视图(在 hello.html 中定义)。第四个视图控制器引用了另一个名为 login 的视图。您将在下一节中创建该视图。
在这一点上,您可以跳到“运行应用程序”并运行应用程序,而无需登录任何内容。
现在您已经拥有一个未受保护的 Web 应用程序,您可以为其添加安全性。
设置 Spring Security
假设您想阻止未经授权的用户查看 /hello 的问候页面。现在,如果访问者点击主页上的链接,他们会看到问候语,没有任何阻止他们的障碍。您需要添加一个障碍,强制访问者在看到该页面之前先登录。
您可以通过在应用程序中配置 Spring Security 来实现这一点。如果 Spring Security 在类路径中,Spring Boot 会自动使用“基本”身份验证保护所有 HTTP 端点。但是,您可以进一步自定义安全设置。您需要做的第一件事是将 Spring Security 添加到类路径中。
对于 Gradle,您需要在 build.gradle 的 dependencies 闭包中添加三行(一行用于应用程序,一行用于 Thymeleaf & Spring Security 集成,一行用于测试),如下所示
implementation 'org.springframework.boot:spring-boot-starter-security'
//  Temporary explicit version to fix Thymeleaf bug
implementation 'org.thymeleaf.extras:thymeleaf-extras-springsecurity6:3.1.2.RELEASE'
testImplementation 'org.springframework.security:spring-security-test'
以下列表显示了完整的 build.gradle 文件
plugins {
	id 'java'
	id 'org.springframework.boot' version '3.3.0'
}

apply plugin: 'io.spring.dependency-management'

group = 'com.example'
version = '0.0.1-SNAPSHOT'
sourceCompatibility = '17'

repositories {
	mavenCentral()
}

dependencies {
	implementation 'org.springframework.boot:spring-boot-starter-web'
	implementation 'org.springframework.boot:spring-boot-starter-thymeleaf'
	implementation 'org.springframework.boot:spring-boot-starter-security'
	//  Temporary explicit version to fix Thymeleaf bug
	implementation 'org.thymeleaf.extras:thymeleaf-extras-springsecurity6:3.1.2.RELEASE'
	testImplementation 'org.springframework.security:spring-security-test'
	testImplementation 'org.springframework.boot:spring-boot-starter-test'
}

test {
	useJUnitPlatform()
}
对于 Maven,您需要在 pom.xml 的 <dependencies> 元素中添加两个额外条目(一个用于应用程序,一个用于测试),如下所示
<dependency>
	<groupId>org.springframework.boot</groupId>
	<artifactId>spring-boot-starter-security</artifactId>
</dependency>
<dependency>
	<groupId>org.thymeleaf.extras</groupId>
	<artifactId>thymeleaf-extras-springsecurity6</artifactId>
	<!-- Temporary explicit version to fix Thymeleaf bug -->
	<version>3.1.1.RELEASE</version>
</dependency>
<dependency>
	<groupId>org.springframework.security</groupId>
	<artifactId>spring-security-test</artifactId>
	<scope>test</scope>
</dependency>
以下列表显示了完整的 pom.xml 文件
<?xml version="1.0" encoding="UTF-8"?>
<project xmlns="http://maven.apache.org/POM/4.0.0" xmlns:xsi="http://www.w3.org/2001/XMLSchema-instance"
	xsi:schemaLocation="http://maven.apache.org/POM/4.0.0 https://maven.apache.org/xsd/maven-4.0.0.xsd">
	<modelVersion>4.0.0</modelVersion>
	<parent>
		<groupId>org.springframework.boot</groupId>
		<artifactId>spring-boot-starter-parent</artifactId>
		<version>3.3.0</version>
		<relativePath/> <!-- lookup parent from repository -->
	</parent>
	<groupId>com.example</groupId>
	<artifactId>securing-web-complete</artifactId>
	<version>0.0.1-SNAPSHOT</version>
	<name>securing-web-complete</name>
	<description>Demo project for Spring Boot</description>

	<properties>
		<java.version>17</java.version>
	</properties>

	<dependencies>
		<dependency>
			<groupId>org.springframework.boot</groupId>
			<artifactId>spring-boot-starter-thymeleaf</artifactId>
		</dependency>
		<dependency>
			<groupId>org.springframework.boot</groupId>
			<artifactId>spring-boot-starter-web</artifactId>
		</dependency>
		<dependency>
			<groupId>org.springframework.boot</groupId>
			<artifactId>spring-boot-starter-security</artifactId>
		</dependency>
		<dependency>
			<groupId>org.thymeleaf.extras</groupId>
			<artifactId>thymeleaf-extras-springsecurity6</artifactId>
			<!-- Temporary explicit version to fix Thymeleaf bug -->
			<version>3.1.1.RELEASE</version>
		</dependency>
		<dependency>
			<groupId>org.springframework.security</groupId>
			<artifactId>spring-security-test</artifactId>
			<scope>test</scope>
		</dependency>

		<dependency>
			<groupId>org.springframework.boot</groupId>
			<artifactId>spring-boot-starter-test</artifactId>
			<scope>test</scope>
		</dependency>
	</dependencies>

</project>
以下安全配置(来自 src/main/java/com/example/securingweb/WebSecurityConfig.java)确保只有通过身份验证的用户才能看到秘密问候语
package com.example.securingweb;

import org.springframework.context.annotation.Bean;
import org.springframework.context.annotation.Configuration;
import org.springframework.security.config.annotation.web.builders.HttpSecurity;
import org.springframework.security.config.annotation.web.configuration.EnableWebSecurity;
import org.springframework.security.core.userdetails.User;
import org.springframework.security.core.userdetails.UserDetails;
import org.springframework.security.core.userdetails.UserDetailsService;
import org.springframework.security.provisioning.InMemoryUserDetailsManager;
import org.springframework.security.web.SecurityFilterChain;

@Configuration
@EnableWebSecurity
public class WebSecurityConfig {

	@Bean
	public SecurityFilterChain securityFilterChain(HttpSecurity http) throws Exception {
		http
			.authorizeHttpRequests((requests) -> requests
				.requestMatchers("/", "/home").permitAll()
				.anyRequest().authenticated()
			)
			.formLogin((form) -> form
				.loginPage("/login")
				.permitAll()
			)
			.logout((logout) -> logout.permitAll());

		return http.build();
	}

	@Bean
	public UserDetailsService userDetailsService() {
		UserDetails user =
			 User.withDefaultPasswordEncoder()
				.username("user")
				.password("password")
				.roles("USER")
				.build();

		return new InMemoryUserDetailsManager(user);
	}
}
WebSecurityConfig 类使用 @EnableWebSecurity 注解,以启用 Spring Security 的 Web 安全支持并提供 Spring MVC 集成。它还暴露了两个 Bean,用于设置 Web 安全配置的一些具体信息
SecurityFilterChain Bean 定义了哪些 URL 路径应该受到保护,哪些不应该。具体来说,/ 和 /home 路径被配置为不需要任何身份验证。所有其他路径都必须经过身份验证。
用户成功登录后,将被重定向到之前请求的需要身份验证的页面。有一个自定义的 /login 页面(由 loginPage() 指定),并且允许所有人查看该页面。
UserDetailsService Bean 设置了一个内存中的用户存储,其中包含一个用户。该用户的用户名为 user,密码为 password,角色为 USER。
现在您需要创建登录页面。已经有一个用于 login 视图的视图控制器,因此您只需要创建登录视图本身即可,如下列表(来自 src/main/resources/templates/login.html)所示
<!DOCTYPE html>
<html xmlns="http://www.w3.org/1999/xhtml" xmlns:th="https://www.thymeleaf.org">
    <head>
        <title>Spring Security Example </title>
    </head>
    <body>
        <div th:if="${param.error}">
            Invalid username and password.
        </div>
        <div th:if="${param.logout}">
            You have been logged out.
        </div>
        <form th:action="@{/login}" method="post">
            <div><label> User Name : <input type="text" name="username"/> </label></div>
            <div><label> Password: <input type="password" name="password"/> </label></div>
            <div><input type="submit" value="Sign In"/></div>
        </form>
    </body>
</html>
这个 Thymeleaf 模板提供了一个表单,用于捕获用户名和密码并将其发布到 /login。按照配置,Spring Security 提供一个过滤器来拦截该请求并验证用户。如果用户身份验证失败,页面将重定向到 /login?error,您的页面将显示相应的错误消息。成功退出后,您的应用程序将被发送到 /login?logout,您的页面将显示相应的成功消息。
最后,您需要为访问者提供一种方式来显示当前用户名和退出。为此,更新 hello.html 以向当前用户打招呼并包含一个 Sign Out 表单,如下列表(来自 src/main/resources/templates/hello.html)所示
<!DOCTYPE html>
<html xmlns="http://www.w3.org/1999/xhtml" xmlns:th="https://www.thymeleaf.org"
      xmlns:sec="https://www.thymeleaf.org/thymeleaf-extras-springsecurity6">
    <head>
        <title>Hello World!</title>
    </head>
    <body>
        <h1 th:inline="text">Hello <span th:remove="tag" sec:authentication="name">thymeleaf</span>!</h1>
        <form th:action="@{/logout}" method="post">
            <input type="submit" value="Sign Out"/>
        </form>
    </body>
</html>
我们通过使用 Thymeleaf 与 Spring Security 的集成来显示用户名。“Sign Out”表单向 /logout 提交 POST 请求。成功退出后,它会将用户重定向到 /login?logout。
Thymeleaf 3.1 不再提供对 HttpServletRequest 的访问,因此不能使用 HttpServletRequest#getRemoteUser() 来访问当前通过身份验证的用户。 |
运行应用程序
Spring Initializr 为您创建了一个应用程序类。在这种情况下,您不需要修改该类。以下列表(来自 src/main/java/com/example/securingweb/SecuringWebApplication.java)显示了该应用程序类
package com.example.securingweb;

import org.springframework.boot.SpringApplication;
import org.springframework.boot.autoconfigure.SpringBootApplication;

@SpringBootApplication
public class SecuringWebApplication {

	public static void main(String[] args) throws Throwable {
		SpringApplication.run(SecuringWebApplication.class, args);
	}

}
构建可执行 JAR
您可以使用 Gradle 或 Maven 从命令行运行应用程序。您还可以构建一个包含所有必需依赖项、类和资源的单个可执行 JAR 文件并运行它。构建可执行 JAR 可以轻松地在开发生命周期、不同环境等场景中发布、版本化和部署服务作为应用程序。
如果您使用 Gradle,可以使用 ./gradlew bootRun 运行应用程序。或者,您可以使用 ./gradlew build 构建 JAR 文件,然后按如下方式运行 JAR 文件
如果您使用 Maven,可以使用 ./mvnw spring-boot:run 运行应用程序。或者,您可以使用 ./mvnw clean package 构建 JAR 文件,然后按如下方式运行 JAR 文件
| 此处描述的步骤创建了一个可运行的 JAR 文件。您还可以构建一个经典的 WAR 文件。 |
应用程序启动后,将浏览器指向 https://:8080。您应该会看到主页,如下图所示

当您点击链接时,它会尝试将您带到 /hello 的问候页面。然而,由于该页面是受保护的且您尚未登录,它会将您带到登录页面,如下图所示

| 如果您跳到这里使用了未受保护的版本,您将看不到登录页面。您应该返回并编写其余的基于安全性的代码。 |
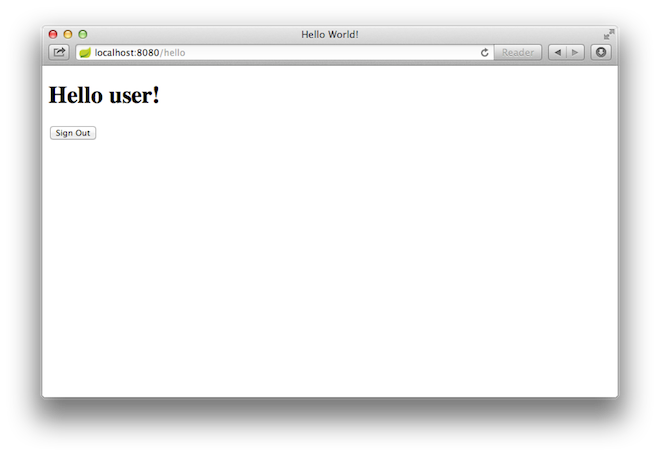
在登录页面,作为测试用户登录,分别在用户名和密码字段输入 user 和 password。提交登录表单后,您将通过身份验证,然后被带到问候页面,如下图所示

如果您点击 Sign Out 按钮,您的身份验证将被撤销,并且您将返回到登录页面,并显示一条消息,表明您已退出登录。
总结
恭喜!您已经开发了一个使用 Spring Security 保护的简单 Web 应用程序。